Pages

Diberdayakan oleh Blogger.
Tampilkan postingan dengan label HOMEMADE. Tampilkan semua postingan

Senin, 16 Februari 2015

Puri for pani puri | Puri for Indian chaat recipes

puri for chaats
I have posted pani puri puri recipe in my sev puri recipe itself. But the post is too long with sev puri recipe, sweet dates tamarind chutney recipe and this puri recipe. So thought making a separate post. I have many chaat recipes pending to post, my lazinessStriaght Face, I make very rarely but that time too I will be too tired to click and impatient me and Aj will finish eating it Cool. This time I am determined to post few. So stay tuned.
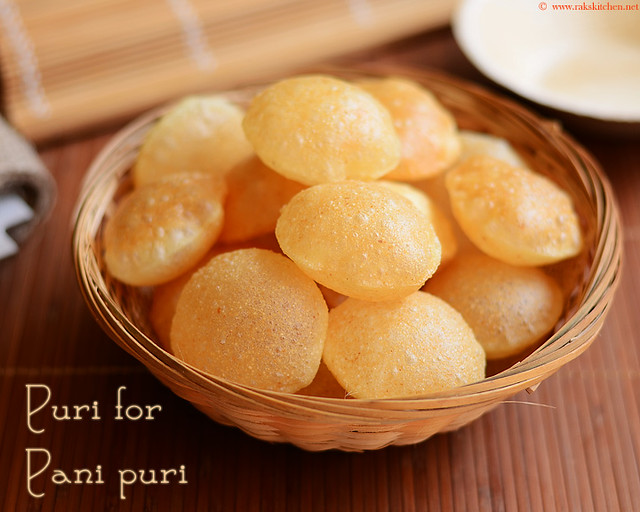
Puri for pani puri

Coming to this puri recipe, in India, we get these puris ready made, so we can always buy it easily and make chaats at home. Also I saw few instant ready to fry and puff puris too available. Just like papad, we can fry when ever needed. But here its hard to find quality pani puri puris. I have bought only once before and it was not fresh. So homemade puris are the only choice. With two chaat lovers at home, its worth making at home Winking.


Puri for pani puri and other chaats

Recipe Cuisine: Indian  |  Recipe Category: Snack
Prep Time:30 mins    |  Cook time: 20 mins    |  Makes: 40

Ingredients


Rawa/ Sooji/ Semolina - 1/2cup

Maida/all purpose flour - 1 tblsp

Warm water or plain soda - 1/4 cup

Salt - As needed

METHOD

  1. Sprinkle warm water/Soda just enough needed and make a crumbly looking sooji as shown in the picture. Then add maida and knead well for 10 minutes and add a tsp of oil towards the end.
  2. 1-pani-puri
  3. The dough should be stiff and smooth,so better be careful while adding water and maida. (adding more maida or water will take long time for the poori to get crispy).Keep aside for 15 minutes. Roll in the dough on a  clean counter top.Roll very very thin,it was bit hard for me,but still its possible.
  4. 2-pani-puri
  5. Cut into small rounds using a lid(I used my mini coffee filter’s lid). Take out the rest, of the dough and roll, knead again with the rest of the dough and repeat to finish all the dough.
  6. 3-pani-puri
  7. Heat oil and when hot, fry the pooris. Immerse the puris with ladle in oil to make it puff nicely. If oil is hot only the puri will puff. Once puffed, put the flame in low and cook over medium flame till crisp.
  8. 4-puri

Notes

    • While deep frying, use enough oil.
    • Oil must be super hot while you drop the puris. Later once puffed up nicely, then put the flame to low and cook for few minutes until golden.
    • You must be patient to cook the puris to get it crisp, cannot cook in high flame and get the result. Only low flame cooking will work.
    • I sometimes add a tblsp of rice flour too for crispiness though it is not authentic.
You can store in airtight container for a week.
puri recipe for chaats

Selasa, 10 Juni 2014

Mango ice cream recipe with tutti frutti

mango-ice-cream
This is the first ice cream recipe I am posting for this summer. when summer started, many readers suggested posting homemade ice cream recipes. I did few for the magazine book, but didn’t thought I would make again and post here. But Mango ice cream is too hard to resist posting. Vj also is a mango lover, so I  made it again last week. I added few raisins and tutti fruity when I made first time and it was a great addition to the ice cream. This time I just added tutti fruity alone. I just love it in the ice cream a lot. With the fresh smell of mango, the ice cream comes out really rich and creamy. You can follow the same recipe in ice cream maker too. But this one is done without any ice cream maker.
homemade-mango-ice-cream

Mango Ice cream recipe

Recipe Cuisine: Indian  |  Recipe Category: Dessert
Prep Time: 12 Hrs freezing time    |  Cook time: 0 mins    |  Serves: 8 scoops

Ingredients


Alphonso mango  2 
Sugar  3/4 cup 
whipping cream  1 cup 
Tutti frutti   4 tblsp 
Milk  1/2 cup 


Method

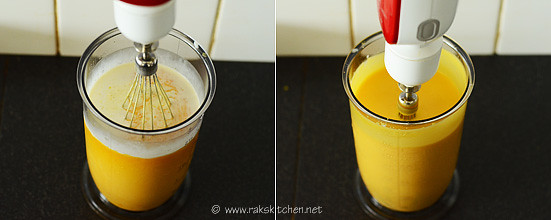
  1. Scoop and collect pulp of mango with a spoon and place it in a blender with sugar, milk and blend well until sugar is dissolved. 1-mango-ice-cream
  2. Add whipping cream and whip for a minute or until all the ingredients are mixed well. 2-mango-ice-cream
  3. Pour into a broad, freezer safe airtight box. Freeze it for 3 hrs. 3-mango-ice-cream
  4. Take out and grind again in a mixer until smooth and repeat the same every 1 hour for 4-5 times. 3-mango-ice-cream
  5. Last time add tutti frutti and freeze for 6 hrs or overnight. Scoop and serve. 5-mango-ice-cream

Notes

  • Adding tutti frutti is optional and you can skip it.
  • If you do not get whipping cream you can try using regular cream too. But this tastes best.
  • Grinding few times ensures soft texture of the ice cream, so make sure you grind it and dont mind the mess.
  • You can use ready made sweetened mango pulps available in tins. Reduce sugar accordingly.

Best dessert one can make with mangoes. Arent the tutti fruttis tempting you to pick and eat?
mango-ice-cream-recipe

Senin, 02 Juni 2014

Iced Lemon Tea Recipe - How to make ice lemon tea

iced-lemon-tea-recipe
I drink Iced lemon tea only when I go to cinemas. That too I got the habit from Vj. Not habit, but I say very firmly I don’t want any drink everytime, but what ever Vj gets, I have few sips from his drink Whistling. But few times I bought bottled iced green lemon tea and had it. I am allergic to tea, I sit like an owl in nights if I have tea, so I drink very rarely. For this summer, I always feel like having something icy cold after the house chores. Most of the time it will be nannaari sarbath with lemon as I have the syrup. But yesterday somehow felt like having ice lemon tea. But I wanted to make use of the lemons too before they get wasted, so made this today and made a post too Winking.
how to make ice lemon tea

Iced lemon tea recipe

Recipe Cuisine: International  |  Recipe Category: Drinks
Prep Time: 15 mins    |  Cook time: 5 mins    |  Serves: 1

Ingredients


Tea powder  1 & 1/2 tblsp 
Water  1 & 1/2 cups 
Sugar  2 tblsp (or as per ur taste) 
Lemon juice  1 tblsp 

Method

  1. Bring water to boil until it bubbles, then add the tea and boil in medium flame for 3 minutes. 1-boil
  2. Filter through a tea strainer and add sugar, mix to dissolve it. Cool down to room temperature. 2-filter
  3. Squeeze lemon in the tea. Fill a tall glass with ice and pour the tea over it and enjoy! 3-lemon

Notes

    • Add tea powder only after water boils for best results. Do not boil more than 3 minutes as it may turn strong and bitter.
    • Keep covered while the tea comes to room temperature to retain its flavor.
    • Adjust lemon juice and sugar as per your taste. I used one whole lemon’s juice.

Serve it icy cold, as it is ICED lemon tea. Also add ice cubes generously. Keep hydrated this summerCool.
ice-lemon-tea

Selasa, 27 Mei 2014

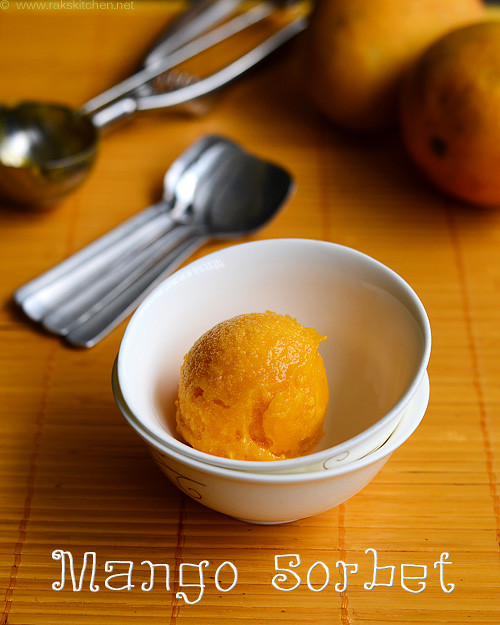
Mango sorbet recipe | Mango recipes

mango-sorbet
Mango sorbet is a must try for mango lovers this mango season! This is so simple, easy with only 3 main ingredients – Mango, sugar and lemon. And it gives full satisfaction for mango lovers. Plus a treat for this summer. I made this for the second time after I loved it when I made it for the magazine. Since I loved it, I decided to post it here. Without any blah blahs, here is the recipe.
mango-sorbet-recipe

Mango Sorbet recipe

Recipe Cuisine: Indian  |  Recipe Category: Breakfast
Prep Time: 5 mins+ 10 hours freezing time     |  Cook time: 5 mins    |  Serves: 3

Ingredients


Mango pulp  1 cup 
Sugar  1/2 cup 
Water  1/2 cup 
Lemon juice  1 tblsp 

Method

  1. Slice the mangoes along the sides and scoop out the pulp using a spoon. Scrap the pulp from the seed as well and collect 1 cup of pulp. Place it in a blender, puree it first.1-scoop
  2. Make a simple sugar syrup by heating sugar and water and just bring to boil to dissolve the sugar completely. Cool down and blend it with the mango pulp, lemon juice.2-sugar
  3. Transfer to a freezer safe airtight container and freeze it for an hour. 3-freeze
  4. Take it out, mix it until smooth, with a fork. (For smoothest texture of all, you can grind the sorbet in mixie instead of mixing with fork).Repeat the same every half hour for 5 more times. Then freeze for 6 to 12 hours depending on your freezer temperature and conditions. Scoop and serve.4-scoop

Notes

    • If you have icecream maker, you can churn the sorbet as per the instructions. This will give you the best result of all - Smoothest sorbet, equal to icecream's texture.
    • I used alphonso mangoes for vibrant yellow coloured result.
    • Lemon juice not only adds a tangy taste, but also must be helping in its texture. So do not omit.
    • MIxing with fork every half hour for 5-6 times helps in smooth texture.

Freeze the serving bowls too for an hour before serving and scoop the sorbet to serve it.

homemade-mango-sorbet

Selasa, 15 April 2014

MOR MILAGAI RECIPE | SUMMER SPECIAL

mor-milagai-recipe
I love love mor milagai as side dish for curd rice and mainly pazhaya sadam Tongue. In my childhood days, during summer, my mom purposely keeps extra rice in the night for the next day’s pazhaya sadam. And some times, if its less and only for one person, me and my mom will try to sneak and have it without each other’s knowledge. That much we love it. And my mom has sundakkai vathal, kothavarangai vathal, mor milagai, chinna vengayam, fresh cut raw mango and any pickle. Atleast 3-4 side dishes will be there. Mostly mom makes mangai thokku. Those days, pazhaya sadam – we call it as pazhayadhu, will be so flavorful. I really miss it these days. Even I keep pazhaya sadam and try eating next day, but it never matches those good old day’s taste Crying. I am not sure why. Is it because of the rice? or there is some other factor. Even my mom says its not the same these days.
Its best for beating the heat in summer as its a great body coolants and has lots of goodness in it. So do not waste the rice or refrigerate it for next day. Make it as pazhaya sadam. How to make it? I was wondering if I have to make a separate post for itWorried. No need, its very simple and easy as a child’s play. Just break roughly the cooked left over rice if its caked, add lots of water so that the water level is 2-3 inches above the rice. Keep covered overnight and taraaa…Cool Pazhaya sadam. Next day, you can just mix the rice with your clean hands and drain water, add salt and a dash of buttermilk, drink the water too alone. Or eat it as such thanniyum sadhamum (with salt, buttermilk added). Sometimes, me and my mom drain and save the water for drinking as mentioned above and make curd rice with pazhaya sadam. My mom sometimes keeps in clay vessels/ containers and it will be so cool and goes through the food pipe so cool and comfortingHappy. And next to mor milagai, my best side dish is chinna vengayam for pazhaya sadam. I love the part of cutting the onion in the rim of the bowl/ plate by pressing against it and make it small pieces and eat it with rice. Forger about the thing that you smell like onion after thatSick.
pazhaya-sadam-with-mor-milagai
I took all the steps for this post when I made it this time before in laws came. Since I was bit busy with them and we went to lot of places, I saved the pictures somewhere safe and now couldn’t find it. Too bad I was cursing myself for that when I heard that maami(MIL) making mor milgai. I was happy that I got a chance to get pictures, but wait, who will take pictures and send me. BILs both hold DSLR, but I was bit hesitant to disturb them in their busy schedules. But thanks to my younger co-sis and  BIL, when I said I want pictures, they took many pictures, more than I would take, in different angles and sent it to me. How sweetLove Struck. But then when I saw all the pictures, I realized that what I made was with the oosi milagai (a thin long variety of the chilli) but maami made with the short stout ones (which is called koda milagai in Thanjavur). I thought I would take the dried chilli what I made here is there for taking final clicks. So I got these as packed parcel, through someone ;) I was so happy that I could make a post. I will sure update if I find my version of steps for this post in future.

Mor milagai recipe

Recipe Cuisine: Indian  |  Recipe Category: Side dish
Prep Time: 20 mins + drying time 10 days    |  Cook time: 5 mins    |  Makes: 2 cups

Ingredients


Chilli  4 cups 
Curd  4 cups 
Salt  4 tblsp or  as needed 


Method

  1. Clean the chilli well and if you want you can cut the stalk of it, not fully though but leaving a little as shown in the picture. When I did, I left the whole stalk in it as I like too. Just slit a little along side or at the bottom of the chilli. This is for salt and buttermilk to get inside easily while soaking. Beat curd (you can use the sour left over curd for this and add water if too thick) and mix salt and these chillies well.1-mor-milagai
  2. Keep closed overnight and next day, take out the chilli alone and dry in hot sun in a large, broad plate or a muram, spread well. Let it dry for the whole day.2-dry-mor-milagai
  3. By evening, again put the chillies back in the buttermilk, mix well and keep closed overnight. Next day, repeat the process. Likewise, repeat drying until all the buttermilk gets into the chilli and then just keep drying the chilli alone in sun for few days in hot sun until the chillies are dried up completely.3-dried-mor-milagai
  4. Store in a closed container and fry when every needed. Heat enough oil and fry the chillies until deep dark brown. I like mine even if its blackened but it tastes great in both ways.4-mor-milagai-fry

Notes

    • If the sun is super hot, 10 days is enough I think to dry, but it took some time for me when I made it here in Singapore, so it depends on the hot sun.
    • When you dry the chillies, do not keep the buttermilk in hot sun full day.
    • Salt quantity is purely your choice, but atleast it whould be enough to take out the spiciness of the chilli.
    • When I made here, since its indoor, the smell will not be so pleasant, Aj started complaining. But my MIL and mom says, it smells nice even while its soaking and drying. :)

Goes perfectly well with curd rice or pazhaya sadam. Also you can use this for tempering mor kuzhambu.

mor-milagai

Rabu, 19 Februari 2014

MINI SAMOSA RECIPE (TRIANGLE SAMOSA) / SAMSA RECIPE - WITH VIDEO

samosa-recipe-triangle         
I had long time wish to try this mini samosa (or samsa as we call it). I have seen here in Fairprice, frozen mini samosas. Its tiny and looks very pretty too. Aj also loves it as he had tried it as starters in parties. I have tried making it sometime back, but could not get it look good, so left it for a while. Now again recently Aj wanted me to try at home and I promised him I will make it on a weekend. I tried last Sunday and it came out good. So I thought of sharing it here. It’s very easy, tasty, crispy and perfect for get together and parties as starter.
samsa-recipe
I made this with the spring roll pastry sheets. Its different from puff pastry sheets, so don’t confuse with it. This is very thin sheets, specially meant for making spring rolls and samosas. I came to know it is now a days available in Chennai in Nuts N Spices as a pack of 20 sheets (Info Courtesy : Aparna Rajeskumar). So you can check in the frozen section. Also if any of you know if its available anywhere in your part of area, please help others by leaving comment in the comments section about where you have got it or seen it.
samsa

Mini triangle samosa recipe

Recipe Cuisine: Indian  |  Recipe Category: Breakfast
Prep Time: 45 mins    |  Cook time: 15 mins    |  Makes: 30

Ingredients


Potato, Large  2 
Onion  1 
Sambar powder/ red chilli powder  1 tsp 
Garam masala powder  1/4 tsp 
Fennel seeds powder  1/4 tsp 
Turmeric powder  1/8 tsp 
Amchur powder / Chaat masala (Optional)  1/4 tsp 
Salt  As needed 
Oil  2 tsp 
Jeera/ cumin seeds  1 tsp 
Coriander leaves, chopped  2 tblsp 
Spring roll pastry sheets (Large size)  8 
Maida  2 tblsp 

Method

  1. Keep pastry sheet at room temperature 30 mins prior preparing the samosa. Boil and peel potatoes. Heat kadai with oil and temper with jeera.1-temper
  2. Add finely chopped onion, followed by the cooked,mashed potatoes. Add the all the masala powders in the ingredients, with salt and sprinkle a tblsp of water.2-spice-powders
  3. Mix well and fry for 2 minutes in medium flame, lastly add coriander leaves, mix well.3-fry
  4. Transfer to the serving bowl. Mix Maida with water to make it a paste. Keep all the ingredients ready.4-ready
  5. By now the sheets would have been ready for preparing. Peel off one by one carefully. Keep covered with clean wet kitchen cloth to keep it damp and avoid drying as instructed in the pack.5-stuff
  6. Cut each sheet to 4 equal sized strips as shown in the picture. Spoon a tsp of the prepared potato masala in each strip, over the top.Fold as shown in the picture into triangle samosas. Refer video to learn in detail how to fold it. Towards the end spread little maida paste and end sticking the samosa.6-fold
  7. Keep the prepared samosas covered as well, preferable with wet kitchen cloth for this too.
    If you do not have spring roll pastry sheets, you can do the same with maida. Make a stiff sough with 1 cup maida, a tblps of oil, salt and water. Keep aside for an hour, knead and make equal sized balls. Roll as thin as possible and cut into square. Use oil half way while rolling in one side to make rolling easy without getting shrunken.7-ready
  8. Do not make this long (large) as if you fold lot, it wont get cooked inside and will become chewy. Follow the same procedure as above and fold to triangles. But make the strips shorter.8-dough
  9. Once everything is folded, heat oil and deep fry both sides in medium flame.9-dough
  10. Once golden in colour, drain in paper towels. You can see both the pastry sheet samosas and the maida dough samosas.10-fry

Notes

    • It may seem tedious, but its not, easier than making spring rolls.
    • If you do not have fennel powder, instead of tempering with jeera, temper with fennel. Or just skip it and add more garam masala powder.
    • Maida paste should be smooth and should be able to keep the samosas sealed. If its too thick then the sticking part will not look smooth, if its too water, it wont stick.
    • This post mainly to show how to use pastry sheets for making samosas, so I have not concentrated over making it from scratch with maida dough. The spring roll pastry sheets gives the maximum, crispiest samosa.
    • You can use any filling of your choice. Like you can make stuffing only with sliced onions.
    • You can make the samosas an freeze it before frying. If you have to make tomorrow, make it today and freeze it. Keep out 30 mins before deep frying and fry as mentioned to save time.

Here's the Video


Serve hot with coffee/ tea and sweet tomato chilli sauce as side dish. Delicious!

mini-samosa-with-pastry-sheets
 

Blogger news

Blogroll

About