Pages

Diberdayakan oleh Blogger.
Tampilkan postingan dengan label BACHELOR COOKING. Tampilkan semua postingan

Kamis, 02 April 2015

Millet curd rice | Bagala bath recipe | Millet recipes

millet-thayir-sadam
One simple dish but many namesWinking. Curd rice, Bagalabath, thayir sadam what ever we name it. Its just delicious and almost life to many. Vj can’t even imagine any lunch without curd rice. I am sure its same for many out there. I wanted to finish up the  millets fast that I got from Bhairavi naturals. So I made this long time back, but kept postponing as its too simple to share. But someday I have to post right? I have already posted Thayir sadam/ curd rice before. This one is also similar but with millets. Whenever I see my MIL packing curd rice for my FIL, she tempers with cashew nuts. I have not tried this before. In my recent trip once I had that curd rice and it was really good. I also once had curd rice in a restaurant on the way to our temple trip. It was really a life saver for me with all those travels to keep my tummy safe. It was not sour thankfully and it was cream with the same ingredients as I have used here. Forgot the restaurant name sorry.
bagalabath-recipe


Millet curd rice recipe

Recipe Cuisine: Indian  |  Recipe Category: Lunch
Prep Time:10 mins     |  Cook time: 20 mins     |  Serves: 3

Ingredients


Millets (I used little millet/ samai) – 1/2 cup

Curd – 1/2 cup

Milk – 1 cup

Carrot, finely chopped – 1 tblsp

Ginger finely grated – 1 tsp

Green chilli, finely chopped – 1

Coriander leaves, finely chopped – 1 tblsp

Curry leaves – 3

Asafoetida – A small pinch

Grapes – 10

Pomegranate – 3 tblsp

Salt – As needed

To temper

Oil – 1 tsp

Mustard – 1 tsp

Curry leaves – 4

Asafoetida – 1 pinch

Method

  1. Was the millet and pressure cook for 4 whistles with 1 & 1/2 cups of water.
  2. 1-cook
  3. Let it cool down. Add milk to it and mash well without any lumps. Add salt and curd and again mix well.
  4. 2-mix
  5. In a small pan, roast broken cashew nuts until golden and keep aside. Temper with the items given under ‘to temper table’. You can finish tempering and add cashews to the same and do it together too. Add to the rice.
  6. 3-temper
  7. Add carrot, ginger, green chilli, torn curry leaves, coriander leaves and asafoetida. Mix gently. Lastly garnish with the fruits and serve.
  8. 4-garnish

Notes

    • You can add raisins in place of fresh grapes, in that case, fry that separately in oil and add.
    • Ginger and green chilli can be added to the tempering items, but I love the fresh flavor of both.

I love my curd rice with various side dishes. Mor milagai, sudakkai vathal, pickle, cut mangoes, vathal kuzhambu and carrot curry is what you see.
bagala-bath-with-millets

Rabu, 01 April 2015

Pomegranate raita recipe

madhulam-pazham-raita
Climate is really hot and these days I don’t feel like eating rice for lunch. That too a big no to the regular cooking- sambar, rice etc. Always feel like drinking something chilled. Coming to today's post, I usually eat pomegranate as such. Sometimes add chaat masala and have it. This time when I got pomegranate, after making pomegranate juice for VJ, I wanted to try this pomegranate raita. I just made it simple but the taste was really good. I am not sure for which main dish this will go well, but I had as such and it was delicious! pomegranate-raita-recipe


Pomegranate raita recipe

Recipe Cuisine: Indian  |  Recipe Category: Lunch - Sides
Prep Time:10 mins     |  Cook time: 0 mins     |  Serves: 2

Ingredients


Curd / Plain yogurt – 1/2 cup

Pomegranate – 1/4 cup heaped

Milk – 1/4 cup

Roasted jeera powder  - 1/4 tsp

Red chilli powder – 1/2 tsp OR

Green chilli – 1

Salt – As needed

Method

  1. This is the way I cut the pomegranate. Slice the head  and bottom of the fruit as shown with a small knife (paring knife), cut the skin alone carefully, by running the knife, over the fruit. Do not do it deep. Now you can open and break the fruit into four. Carefully collect the fruit with out the white parts/skin .
  2. Beat the curd smoothly with milk, in a mixing  bowl, add the other ingredients and mix gently.
    2-mix

Serve chilled, its so good to eat as such! pomegranate-raita

Kamis, 26 Maret 2015

Paneer Quesadilla in griller

quesadilla-using-grillerMore than posting a paneer quesadilla recipe, here I am excited to post this idea of using the griller plate of the sandwich maker for making this quesadilla. I have posted chocolated sandwich using this griller plate before, after that, I tried making hara bhara kabab in this, but the heat was not just enough for kababs. After that, this is one successful use of the griller plate in the sandwich maker. This idea is again from my friend Sangeeta, she have asked me to try this as she makes this very often. This is just an idea, so use your imagination for making any quesadilla with leftover dry sabji, leftover chapati with some grated mozarella cheese. So great way to use up the leftover rotis. If you have leftover roti, make some stuffing and do this, if you have some sabji make roti and use it up in this as a snack for your hungry family who comes hungry to home. You can also use store bought wheat tortillas to make it easy. You can also make Kathi roll, the same way. Just roll your favorite and grill in between the plates. Genius right? Thanks to Sangeetha. You can make the same in waffle maker plates too.
quesadilla-in-griller


Paneer quesadilla recipe

Recipe Cuisine: Indian  |  Recipe Category: Snack
Prep Time:10 mins     |  Cook time: 15 mins     |  Serves: 3

Ingredients


Tortillas / chapati -  6

Paneer cubes – 1 & 1/2 cup

Onion – 1

Capsicum – 1

Red chilli powder – 1 tsp

Chaat masala – 1 tsp

Lettuce (Optional) – few

Tomato sauce – As needed

Mozarella cheese, grated – 1/2 cup

Salt - as needed

Oil – 2 tsp

Method

  1. Thaw paneer, soak in hot water and drain, crumble it roughly. Heat kadai with oil and fry onion and capsicum for a minute. Add crumbled paneer, red chilli powder, chaat masala and salt (Chaat masala has salt so add less). 1-stuffing
  2. Mix in medium flame. Keep a side. Heat the sandwich maker with griller plate. In a chapati place a leaf of lettuce, spread a tblsp of sauce. 2-ready
  3. Spread the paneer filling, 2 tblsp of  mozarella cheese and cover up with another chapati. If your chapati is big, you can just use one and fold it into half.3-spread 
  4. Place it in the hot grill and close. Grill for 4 mins or until golden lines appear. Slightly rotate the quesadilla and grill again for 2 mins. 4-grill
  5. Cut into quarters to serve.5-ready

Notes

    • Make sure the chapati is thick enough.
    • Lettuce is optional. And you can use any tomato based sauce to suit your taste.
    • Use only cheese like mozzarella which doesn't melt and flow much. Also never use too much cheese as it will ooze out.

Serve hot with any cheesy dip or tomato sauce. Check out my rajma quesadilla too.
paneer-quesadilla

Senin, 16 Maret 2015

Eggless waffles recipe | Eggless waffle recipe

eggless-waffles 
When I bought my sandwich maker with 3 interchangeable plates, one among that was this waffle maker plate. I have seen people go mad for waffles. But I knew it will be eggy and never tasted one so far. When I made this for the first time, I was not sure about the texture and I made it soft like pancakes. Then later I asked my friends, they told it should be soft and spongy inside, crisp outside. I tried from a recipe from this blog. After that, I have tried 4 times and finally could come up with a keeper recipe. This recipe is easy and comes out perfectly. You can try this out for your kids breakfast and they will sure enjoy it for a change from their regular breakfast.
  eggless-waffles-recipe


Eggless waffles recipe

Recipe Cuisine: Continental  |  Recipe Category: Breakfast
Prep Time:10 mins    |  Cook time: 16 mins     |  Makes: 4

Ingredients


Self raising flour* - 1 cup

Baking soda - 1/4 tsp

Brown or white sugar - 1 tsp

Butter, melted- 2 tblsp

Milk - 1 cup

Vanilla essence – 1 tsp (optional)

Lemon – 1/2 tsp

*Self raising flour can be replaced with All purpose flour (Maida) 1 cup + 2 tsp baking powder + 1/4 tsp salt.


Method

  1. Mix flour, sugar, baking soda (all dry ingredients) first with a whisk or you can sieve it twice too. Then add melted butter, milk at room temperature, essence if adding and whisk to a smooth batter. Lastly add lemon juice.
  2. 1-mix
  3. Heat the waffle maker meanwhile. Grease all the parts of the plate with butter or any spray. Pour a ladle full of batter, just to cover the plate. Do not add more otherwise will overflow in the sides. So while pouring itself, pour everywhere in the plate instead pouring at a same place.
  4. 2-pour
  5. Close the lid and cook as per the cooking time instructed in your waffle maker manual. Mine takes 3 & 1/2 to 4 minutes. Take out with help of a tong or spatula.
  6. 3-ready

Notes

    • Oil in place of butter also should work fine.
    • Lemon helps in reacting with the baking powder and soda and makes it soft, pourous inside and crisp outside.
    • Do not add  more baking soda, or powder or lemon juice than mentioned for this recipe, otherwise it may not turn out well.

Waffles tastes best when hot. Serve it with honey, or maple syrup or a scoop of your favorite ice cream. Or even Nutella.
eggless-waffles-with-self-raising flour

Sabtu, 28 Februari 2015

Weekend special snack time - Bajji Platter

Bajji platter

From my childhood, bajji is one of the snacks that mom makes for evening snack when ever the family is hungry. Not that often but when she makes it will be always a Bajji platter like this. Ours was a family of 6 with myself, bro, my parents and grandparents. So it does makes sense to make it as a platter to feed all of us. We skip dinner that day after this, of course. No KFC, no Mc Donalds,no Burger King, no Pizza hut etc; only this home made junk and I am sure all of you will agree this is lot more better when compared to the outside junk food in the restaurants. With fresh vegetables, our own not re-used oil and what else we need to be satisfied. Even MIL makes it as a platter when ever she makes. So this is best and simple snack we can make at home. It will be handy when someone comes home and no need to think too much, 15 minutes preparation time and 20 minutes cooking time. Make a chutney and with a tea/ coffee you can finish it. With world cup going on, try once for your family, friends relatives who visits home and enjoy the match Winking. Though I too make it this way, never thought of posting this, thanks again to Sangeeta my friend for insisting me to post.
I have made potato, plantain, brinjal, onion – the classics and chilli, paneer this time. Potato and paneer is my kid’s favorite. Though baby corn is his all time favorite, I had no stock.  Onion and plantain are Vj’s favorite. Brinjal and chilli is mine Happy.
Other veggies which is not here and can be used in usual conditions are Baby corn, capsicum, palak, cauliflower and also bread. There should be more choices which I don’t know, if you know please leave it as a comment.
Here are the links to the bajji/ Pakora recipes I have
  1. Plantain/ vazhakka bajji recipe
  2. Chilli/ molaga bajji recipe
  3. Palak pakora recipe
  4. Paneer pakora recipe
  5. Bread pakora recipe
  6. Cauliflower pakora recipe
  7. Baby corn fingers (bajji) recipe
  8. Coconut chutney recipe
  9. Ginger cardamom tea

Some notes to make perfect bajji
  • First thing is you need sharp knife to neatly slice the veggies. Onion definitely needs a sharp knife, otherwise before you cut a slice, the rings will be separate.
  • The vegetables can be sliced thick or thin, but I slice it thin as it is easy to cook.
  • If the batter is too thick, it will be too dry to eat also gets long time to cook inside. Wont be tasty.
  • If batter is too runny, it will drink too much oil.
  • Adding a tsp of ghee or a tblsp of hot oil from the kadai to the batter will enhance taste also will drink less oil.
  • Adding ajwain, jeera and asafoetida will help in digestion as well as flavor to the bajji.
  • Drink a chaas or hot ginger tea or atleast a cup of hot water for easy digestion in case you over eat.
  • Need enough oil for the bajjis to puff up nicely.


Have a nice weekend! Happy

Senin, 23 Februari 2015

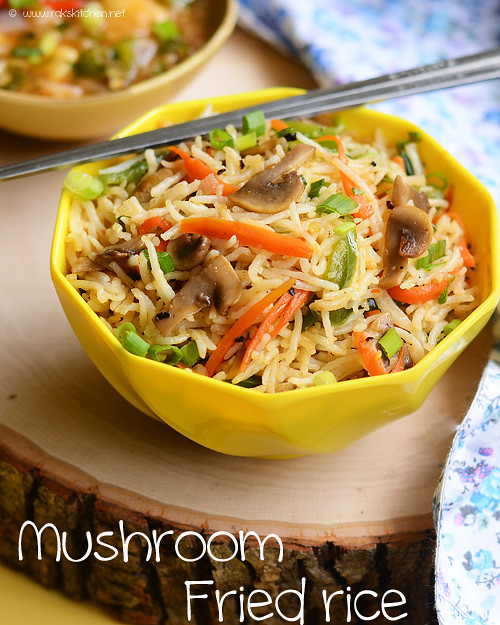
Mushroom fried rice recipe | Veg mushroom fried rice

mushroom fried rice 1
This was the first recipe I tried with mushrooms before I tried the mushroom matar gravy, coz of its simplicity. And it came out really good, that we all of us finished it. So if you are like me, try fried rice with mushroom firstWinking. It can be made in jiffy with less effort, just like the regular fried rice but just add on mushrooms to it. Since mushroom has high nutritional value, sure we can be content giving this to our family. Let’s start this week with this simple mushroom recipe and stay tuned for more exciting recipes coming up here in Rak’s kitchenHappy.
I was supposed to post this last week thursday itself. But it was long weekend here for Chinese new year and was bit tied up with works, so I took myself a short break from blogging. Also I was overwhelmed with the response I got for my last post Pani puriLove Struck. Both in Facebook (32k plus genuine likes, thank you all Blushing) and my readers. I know Pani puri is many people’s favorite, still never expected this much response that’s why was so happy through outBig Grin.
Mushroom fried rice


Veg Mushroom fried rice recipe

Recipe Cuisine: Indian  |  Recipe Category: Lunch
Prep Time:20 mins    |  Cook time: 20 mins (Provided rice is ready)    |  serves: 3

Ingredients


Cooked rice – 2 cups

Mushroom – 8

Carrot – 1/2

Capsicum – 1/2

Finely chopped garlic – 1 tblsp

Green chilli - 1

Spring onion – 4 sprigs

Black pepper powder – 1 tsp

Soya sauce – 1 tsp

Chilli tomato sauce – 2 tsp

Salt – As needed

Olive oil – 3 tblsp

Method

  1. Cut carrot into thin strips, capsicum too into strips. Chop the spring onion green and white part separately. If no much white part in the bottom, use 1/2 regular onion. Slice mushrooms and cut each slice to half.  Heat a pan add oil, add garlic and give it a stir. Add onion and slit green chilli and fry till transparent.
  2. 1-step
  3. Add carrot and fry for a minute in high flame, followed by mushroom and capsicum. Fry for one more minute in high flame.
  4. 2-cook
  5. Once mushroom is cooked, add salt, both sauces, pepper powder and lastly the green part of spring onion. Mix well.
  6. 3-toss
  7. Add cooked rice lastly and toss until the rice gets heated up.
  8. 4-ready

Notes

    • I used white button mushrooms. Always use mushrooms within a day or two as you buy.
    • You can add peas, corn or cabbage in the same recipe.
    • Chilli tomato sauce can be replaced with pure chilli sauce.
    • I have used black pepper, white pepper can also be used.
    • I used basmati rice, you can use any left over rice too.

Serve hot with any manchurian recipe like baby corn manchurian, cauliflower manchurian, chilli paneer gravy or veg manchurian gravy if you want gravy kind.
Mushroom fried rice recipe

Senin, 09 Februari 2015

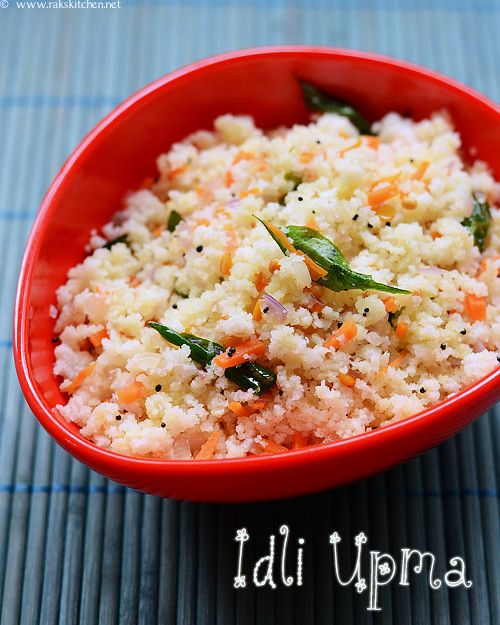
Idli upma recipe | Easy South Indian idli upma

idli-upma-recipe-001   
Idli upma? Drooling Give me 3 times a day for breakfast, lunch and dinner, I can have it without complaining life long. I love it like that. Any upma is my favorite, but this is one easy and unique upma made from the leftover idlies. We call it udhuthu kulukal, which means crumbling and tossing. There must be a lot of variants in this idli upma, but this is the way I like. My mom makes it without carrot and I love that simple version first, but my MIL adds carrot in all possible dishes, including this idli upma to make it eye appealing. In the beginning I used to not like the addition of carrots as I felt it supresses the onion flavor a bit, but now I like this variation too. My mom tempers with coconut oil and the fresh green chillies, onions and curry leaves tossed together gives a divine smell. Its simple but packed with flavors. I have seen many of my friends love idli upma but sadly its opposite when it comes to the guys in the family. Nobody likes it, I dont know why Confused. This can be made along with tea with the left over idlies from your morning breakfast. I most of the times become lazy to make idli upma and have the aaripona idli itself. It’s best only when someone makes you sit, prepare and gives you Winking. Atleast for me, I many times get emotional when I am hungry and no one is there to make something for you Or no one cares to make you sit and give your course of meal hot.

Idli upma recipe

Recipe Cuisine: Indian  |  Recipe Category: Breakfast
Prep Time: 5 mins    |  Cook time: 5 mins    |  Serves: 2

Ingredients


Idli  6
Onion  1, large 
Green chilli  4 
Finely chopped carrot  3 tblsp 
Ginger, finely chopped (optional)  1 tsp 
Salt  2 pinches 

To temper

Coconut oil/ Any cooking oil 1 tblsp
Mustard 3/4 tsp
Urad dal 1 tsp
Channa dal 1 tblsp
Curry leaves 1 sprig


Method

  1. Crumble the idli with a tsp of sesame oil. You can refrigerate the idlies, this will make your job easy as it wont stick to your fingers.1-crumble 
  2. Heat a kadai with oil and temper with the items given under ‘To temper’ table. Add onion and fry until transparent. Add carrots, salt and fry for a minute. Everything in medium flame without changing its colour. Otherwise the upma will turn dull in colour. 2-idli-upma
  3. Add the crumbled idli and just toss for a minute until its mixed well.3-done

Notes

    • Refrigerating the idlis gives beautiful crumble of the idlies. More you refrigerate, easy to crumble.
    • You can add vegetables to fortify this upma.
    • Sesame oil can be added while crumbling.

Serve hot, can be had as such or best with sugar Happy
Check out the other left over idli recipes
idli upma-001
 

Blogger news

Blogroll

About