Pages

Diberdayakan oleh Blogger.

Arsip Blog

Jumat, 28 November 2014

Soya chunks curry, dal palak - lunch menu 51

Soya chunks curry, aloo gobi mutter
So after few weeks, I am posting a lunch menu today againBlushing. Last weekend I could not post anything, so I thought I should click something and keep ready for this weekend’s post. Still couldn’t, so I made this menu for today’s lunch. I was so very bored as Vj went to work today as well, so thought of keep myself occupied with this postBatting Eyelashes. Dal palak and aloo gobi mutter is Aj’s favorite and the other 3 my favorite. So a combination of both of our favorites for today’s lunch menu. Soya chunks curry is very healthy, which I wanted to make for long time now, so today at last made it. Here’s how I prepared this lunch menu. For recipes of each dish, check the below links :

  1. Aloo gobi mutter recipe
  2. Soya chunks curry recipe
  3. Dal palak recipe
  4. Phulka recipe
  5. Chaas recipe

Soya chunks curry, dal palak - Lunch menu 51

Recipe Cuisine: Indian   |  Recipe Category: Lunch
Prep Time: 40 mins     |  Cook time: 1 hr     |  Serves: 4
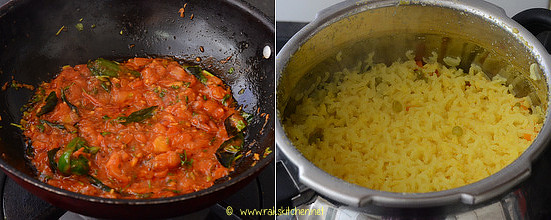
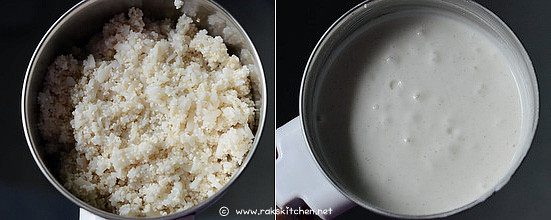
  1. First soaked basmati rice, prepared dough for phulka. In small cooker, pressure cooked soya chunks for curry.
  2. Pressure cooked dal for dal palak. I had baby spinach that I got from fairprice, it was cleaned already so I had no work of cleaning palak.
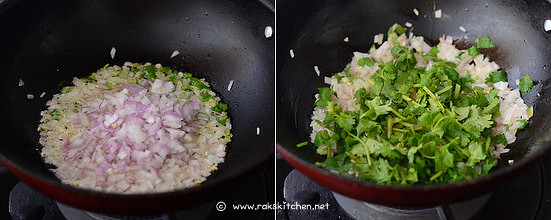
  3. Then chopped onions for dal palak and soya chunks curry, sliced one for aloo gobi mutter. Chopped tomatoes for dal and soya curry.
  4. Cubed potatoes, cut cauliflower and kept immersed in hot water with turmeric and salt.
  5. When dal is done, kept cooker with rice. And started the stove work.
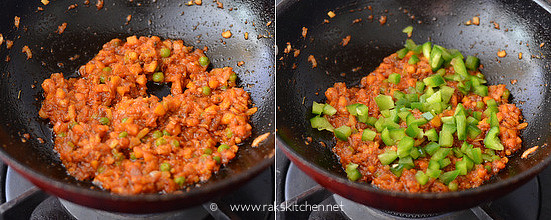
  6. First prepared for dal palak, sauteed, kept aside for cooling to grind. Then prepared soya chunks curry.
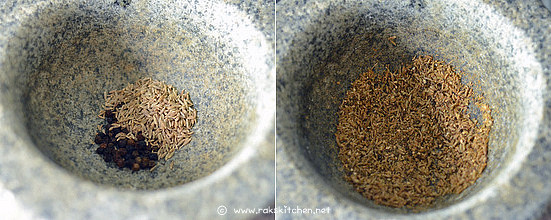
  7. As it was getting done, ground for aloo gobi mutter and palak. Once soya chunks curry done, prepared aloo gobi mutter.
  8. Prepared dal palak side by side. Prepared chaas and lastly phulka when everything was ready!

dal palak, phulka, chaas
Have a happy weekend everyone Love Struck.

Kamis, 27 November 2014

Milagu Jeeraga adai recipe (with Kuthiraivali) | Millet recipes

pepper-jeera-adai
This milagu jeeraga adai is made with regular parboiled rice, but I tried it today with Barnyard millet (Kuthiraivali in Tamil / Jhangora in Hindi / Odalu in Telugu / Oodalu in Kannada). You can buy organic barnyard millet online if you are in Singapore through Bhairavi naturals. My mom makes this often and we all love it. My mom pats it with hands as thick adais. But can be made like this with ladle as we do our orappu adai. Some people have a tradition of making this for karthigai deepam, but we make only karthigai pori and pori urundai for the function. We make this for dinner. It has been years since I had this. After marriage I have not tried this on my own. Its really simple but had an amazing flavor of pepper and jeera that goes well with the rice. We never have anything as side dish for this, eat as such. Do not under estimate the taste of this adai with its simple ingredients. If you make it once, you can’t just eat one. And you will thank me for sure for introducing this adai to youBatting Eyelashes. It needs no standing time, can be made as you grind. 
millets-adai

Milagu jeeraga adai recipe

Recipe Cuisine: Indian  |  Recipe Category: Breakfast/ Dinner
Prep Time: 2 Hr soaking time    |  Cook time: 2 mins per adai    Serves: 4

Ingredients


Barnyard millet  1 cup 
Poha / Aval  1/4 cup 
Pepper  1 tsp 
Jeera  1 tsp 
Grated coconut  1/4 cup 
Salt  As needed 

Method

  1. Soak the millet for 2 hrs along with poha after washing it once. First powder pepper and jeera coarsely, keep aside and then grind the millet. I used my mortar and pestle.
  2. 2-powder
  3. Drain water from the soaked millet and grind it to a paste with salt. No need to grind very smooth, little coarse is fine. but not like rava, more finer than that.
  4. 1-grind
  5. Mix powdered pepper, jeera and coconut, mix well. Check for salt.
  6. 3-mix
  7. Make thick adai with a ladle full of batter over hot tawa and cook both sides in  medium flame until done. You can smear little oil after flipping.
  8. 4-cook

Notes

    • If you are making with regular rice, idly rice works best, or do it with parboiled rice. Soak for 3 hrs. Otherwise same procedure.
    • You can add finely chopped coconut bits instead of grated coconut, it will be a nice texture twist for the adai.
    • Poha is to make the adai soft.
    • Coconut oil can be used for smearing.


Serve hot as such, no need for any accompaniment as it may suppress the pepper flavor. If you want, you can try any thogaiyal.
 milagu-jeeraga-adai

Rabu, 26 November 2014

Vegetarian tacos recipe | Rajma tacos recipe (Red kidney bean)

red-kidney-bean-tacosTacos is very new to me. I saw in a cookery show first time. Later Vj keeps insisting me to try Mexican dishes as it has few good vegetarian recipes and suits our taste buds too. But I used to ask him what to try. Later tried Quesadilla and Salsa. And this is my next one. But I made it my way with the ingredients I had in my pantry, so that my readers also find it simple and easy to try. Only thing you need to get specially is taco shells. If at Chennai, you can try at Amma naana, Nilgiris, Nuts N spices, Gormei (gourmet) Market - CIT Colony/Gandhinagar. It comes out really tasty and healthy with Rajma (red kidney beans), only very less sour cream (optional) and cheese.
vegetarian-tacos-recipe

Vegetarian rajma tacos recipe

Recipe Cuisine: Indian  |  Recipe Category: Snack
Prep Time: 12 hrs soaking time    |  Cook time: 30 mins    Makes: 10

Ingredients for rajma filling


Rajma (Red kidney beans) , cooked or tinned  1 cup 
Garlic  1 flake 
Onion  1 
Tomato  1, pureed 
Fresh red ripe chilli (or spicy green chilli)  2 
Coriander leaves  1/4 cup 
Black pepper powder  1 tsp 
Olive oil  3 tblsp 
Salt  As needed 


To serve

Taco shells 10
Onion 1
Tomato 1
Coriander leaves 1/4 cup
Lemon juice 2 tsp
Sour cream 3 tblsp
Grated cheese 4 tblsp


Method

  1. Pre heat oven at 180 deg C and bake the taco shells arranged in a baking tray as show in the picture. Leave little space so that it gets heated evenly.
  2. 1-bake 
  3. Once done, leave it in the oven for 3 – 4 mins and proceed with the filling. Heat oil and fry finely chopped garlic and green chillies for half a minute.
  4. 2-crisp 
  5. Add finely chopped onion and fry until transparent. Add the coriander leaves.
  6. 3-fry 
  7. Once it reduces in volume, add pureed tomato. I boiled tomato in hot water for a minute, peeled the skin, and ground it to make puree. Fry until oil separates. May take 3 mins in medium flame.
  8. 4-puree 
  9. Add cooked rajma and mix well for 2 minutes.Add required salt, water 1/2 cup and simmer for 5 minutes or until it turns semi dry.
  10. 5-add 
  11. Add black pepper and mix well. Now for serving, finely chop onion, tomato, coriander leaves and mix well with lemon juice. Keep all the needed items ready.
  12. 6-assemble
  13. Take a crisp taco shell, first fill with the rajma a layer, then a tsp of sour cream.
  14. 7-arrange 
  15. Then fill with the onion tomato mix and lastly grated cheese.
  16. 8-arrange

Notes

    • Baking the tacos is to make it crispier. Cannot be done in microwave mode.
    • You can skip sour cream too if you dont have. Also you can use hung curd in place of sour cream.
    • Monetary jack cheese or any mild cheese works best, processed cheese also can be used.
    • I used tinned rajma, if using tinned, drain and wash well before using.
    • To cook rajma, choose the red ones, not the black and soak overnight. Cook with enough water for 5 whistles with little salt.
    • Make sure you add required salt in rajma otherwise it will be bland. I guess tinned one has salt in it.
    • As soon as you assemble, serve/ eat it as it may go soft.

Perfect for your kids/ hubbies who come back to home, as snack. If you keep everything ready, you can just assemble and give them. Filling too, to satisfy their hunger pangs.
rajma-tacos-recipe

Senin, 24 November 2014

Indian style pasta | Masala pasta recipe

indian-style-pasta
I have tried masala pasta in Indian style twice before. Both times, I could not balance the taste so ended up as total flops. So after that I never dared to try that way. But off late been craving for a spicy, desi style pasta, so wanted to give it a try. And until I finished, I wasn’t sure about the taste. But it turned out perfect. So I should stick to this recipe for a whileBlushing. I always have pasta in stock as I pack it for one day’s lunch for Aj. Mostly he likes penne pasta. Then if he gets bored, he ask me to buy either fusilli or macaroni. But few weeks back I found this farfalle aka bow-tie pasta at CPB fairprice. I have never bought that cute shaped pasta before so, quickly bought it and kept. I wanted to try something italian with it, but I could not wait to try this masala pasta, so used it to make it. For this masala pasta, I would recommend these kind of shapes rather than the long spaghetti kind of pastas. This fits in perfect for lunch boxes or for dinner. Do try this and send in your pictures to rakskitchen@gmail.com or as a message to my Rak’s kitchen pageBatting Eyelashes.
masala-pasta-recipe

Indian style masala pasta recipe

Recipe Cuisine: Indian/ Fusion  |  Recipe Category: Lunch/ Dinner
Prep Time: 10 mins    |  Cook time: 25 mins    Serves: 2

Ingredients

Pasta (I used Farfalle) - 1 cup

Onion - 1

Tomato - 1, large

Garlic, finely chopped - 1 tblsp

Red chilli powder - 1 tsp

chopped carrot, peas - 1/4 cup

Chopped capsicum - 1/4 cup

Turmeric powder - 1/4 tsp

Garam masala powder - 1/2 tsp

Black pepper powder - 1/4 tsp

Kasoori methi - A pinch

Any Italian seasoning - 1/2 tsp

Chopped coriander leaves - 2 tblsp

Salt - As needed

To temper

Olive oil - 3 tblsp

Jeera/ cumin seeds - 2 tsp

Method

  1. Boil 4 cups water and add the pasta, required salt. Cook for 10- 12 mins or as per the package instructions.
  2. 1-cook
  3. Drain in a metal strainer, once the pasta is done. reserve 1/4 cup water drained for later use. Boil water and keep the tomato immersed for a minute. Water should be really hot. Or you can also boil for a minute with the tomato.
  4. 2-blanch
  5. Take out the tomato, run through cold water, peel off the skin. This is called blanching.  Grind coarsely.
  6. 3-grind
  7. Heat a kadai with oil and temper with jeera. Do not let it burn, so do it in medium flame. Add garlic and give it a stir for half a minute.
  8. 4-tadka
  9. Add finely chopped onion and fry until transparent. Add the vegetables. Add required salt and fry for 2 minutes in medium flame. Add pureed tomato, red chilli, garam masala, turmeric powders, kasoori methi, italian seasoning.
  10. 5-veggies
  11. Fry until the oil separates. May take a couple of minutes in medium flame. Add chopped capsicum lastly and fry for a minute.
  12. 6-capsicum
  13. Add the cooked pasta. If the pasta is stuck to each other, add the reserved water to loosen it up. Stir well for a minute or two and lastly add black pepper powder and garnish with chopped coriander leaves.
  14. 7-ready

Notes

    • If you are an office goer, you can soak the pasta and when you are back from office, just boil water and add the pasta to it. Instantly, pasta gets cooked. But make sure not to over cook as there is more probability.
    • If making for kids, you can mix some butter along with olive oil.
    • You can use vegetables of your choice. Like broccoli etc.
    • Olive oil is good for health, so no need to be stingy in adding it.

Enjoy hot, perfectly jazzed up masala pasta, just to satisfy the Indian taste buds. Try for this winter.

indian-masala-pasta

Jumat, 21 November 2014

Thinai semiya upma recipe | Millet breakfast recipes

thinai-semiya-upma
Among millets, thinai is one difficult millet to incorporate in everyday cooking. Its good when made as sweets, so I made thinai sweet paniyaram. Want to try sakkarai pongal and payasam later. But what about savory items? So when I got a pack of organic thinai semiya pack from Bhairavi Naturals, I was very happy that I could make something with thinai. So I made upma with this first as I wanted to make savory item. You can steam this and make payasam or mix with sugar and grated coconut as well. But I like upma. And it was very nice. Better than ragi semiya upma also healthier than the regular semiya too. So friends in Singapore you can order this organic millet sevai and all other organic millets online through Bhairavi Naturals.

English: Foxtail Millet; Hindi: Kangni; Tamil: Thinai; Telugu: Korra; Kannada: Navane; Malayalam: Thina
thinai semiya

Thinai semiya upma recipe

Recipe Cuisine: Indian  |  Recipe Category: Breakfast
Prep Time: 5 mins    |  Cook time: 15 mins    Serves: 1

Ingredients


Thinai semiya 1 cup heaped
Onion 1
Green chilli 2
Carrot, beans, peas – chopped 1/2 cup
Ginger, finely chopped 1 tsp
Salt As needed

To temper

Oil 2 tsp
Mustard 3/4 tsp
Urad dal 2 tsp
Channa dal 1 tblsp
Curry leaves 1 sprig

Method

  1. Keep the thinai semiya immersed in enough water for 3 mins. Drain water completely in a metal strainer.
  2. 1-soak
  3. Steam cook in an idli pot for 5 minutes. Once done, invert in a plate and fluff. Keep covered. Heat a pan with oil and temper with the items given under ‘To temper’ table.
  4. 2-steam
  5. Add ginger, onion, green chilli and fry till transparent. Add the finely chopped vegetables. Add little salt needed for veggies and cook covered in low flame for 2-3 mins until the veggies are done.
  6. 3-fry
  7. Add required salt, the cooked sevai, and mix well for a minute. You can sprinkle with little coconut oil if you want.
  8. 4-mix

Notes

    • Do not soak more than 3 minutes, otherwise it will become mushy. Also do not over cook while steaming.
    • In step 4, after adding salt, give a quick stir and then the cooked sevai if you feel mixing of salt may be difficult.
    • You can make simply without veggies too, but make it healthy by adding veggies.

I had as such, if you want, you can have it with sugar, curd or coconut chutney.
thinai-semiya-upma-recipe

Rabu, 19 November 2014

Dal khichdi recipe (Moong dal khichdi without onion, garlic)

dal-khichdi
I am trying and tasting dal khichdi for the first time. When ever someone says I had dal khichdi for lunch, I will be so so very much tempted to taste. I wanted to try for long time but I had no idea for the recipe. I browsed online too sometime back, but everything had ginger garlic paste, whole garam masalas, which I was imagining myself how it would be if we add all these things to south Indian pongal. But Sangeeta told me a recipe recently and which was very simple and just perfect to suit my taste. I wanted to try for few days but today was the perfect day to try. I think this is a perfect one pot meal for a rainy, lazy day, you can make and have it hot. Kids would love with ghee and its loaded with protien, carbs with added veggies to make you feel full and energized. I will make this often for myself here after.
dal-khichdi-recipe

Dal khichdi recipe

Recipe Cuisine: Indian  |  Recipe Category: Lunch
Prep Time: 30 mins    |  Cook time: 20 mins    Serves: 4

Ingredients


Rice - 1/2 cup

Moong dal - 1/2 cup minus 1 tblsp

Water - 4 &1/2 cups

Mixed vegetables, chopped - 3/4 cup

Turmeric - 1/4 tsp

Salt - As needed


To temper

Oil/ ghee - 2 tblsp

Jeera - 2 tsp

Finely chopped ginger - 2 tsp

Green chilli - 2

Curry leaves - 1 sprig

Tomato - 2

Coriander leaves, chopped - 3 tblsp

Red chilli powder - 1 tsp

Garam masala - 1/2 tsp


Method

  1. Wash and soak rice and dal together for half hour and pressure cook with turmeric, vegetables and 1/2 the salt. Bring everything to boil and close the lid, put the pressure valve after steam comes. Pressure cook for 3 whistles. Make sure you use a big pressure cooker. I used my pot shaped cooker. After first whistle, put the flame to medium.
  2. 1-soak
  3. Finely chop tomato, slit green chillies. Heat a kadai and temper with jeera, ginger, green chilli, curry leaves and give it a stir. Add tomatoes, add remaining salt, red chilli powder, coriander leaves and garam masala.
  4. 2-temper
  5. Fry until mushy and oil separates. By now the rice, dal, veggies will be done. Open the cooker and  mash well.
  6. 3-done
  7. Add the tomato with other masalas we fried, to it and mix well.
  8. 4-mash

Notes

    • I used 5 beans, 1 small carrot and 1/2 cup green peas. You can add potato too.
    • You can skip garam masala too.
    • Keep 1/2 cup hot water ready, if the kichdi is too dry, you can add it and mix.
    • Gives so much volume, so make sure you add salt accordingly.
    • Soaking is really important.
    • You can pressure cook and while its getting cooked, chop the other ingredients needed.

Perfect for a rainy cold day, serve always hot. Tastes great as such, but you can have it with curd, pickle or even dahi kadhi.
dal-khichdi-with-vegetables
 

Blogger news

Blogroll

About