Pages

Diberdayakan oleh Blogger.

Jumat, 30 Desember 2011

PIZZA BUNS RECIPE

pizza+buns
Wishing you all friends and readers a very Happy and Prosperous New Year! Life is a bit busy these days, so taking a short break, see you guys with more exciting recipes next year, meanwhile enjoy this recipe I posted as guest post at Sandhya's kitchen...This recipe idea flashed,when I saw a pamphlet I got from 7 eleven introducing Pizza bites. I loved the idea and thought it would be easy to make at home. As I have been making pizza from the scratch for quite a while now and have tried several buns, I was pretty confident in try these and enjoyed making these. This could be an easy party snack idea, kids would be super excited to have it and sure we can also enjoy this. The stuffing is flexible so you can experiment it with your favourite topping,let it be simple like what I have used or add on your favourites like black olives,mushrooms…it’s your choice! 
pizza-buns-cut 


Pizza buns recipe

Recipe Cuisine: Continental  |  Recipe Category: Snack
Prep Time:1 Hr     |  Cook time: 18 mins     Makes: 8

Ingredients


All purpose flour - 1 & 1/2 cup

Milk - 1/2 cup

olive oil - 1/8 cup

Salt - 1 tsp

Sugar - 1 & 1/2 tsp

Active dry yeast - 1 tblsp

For the filling

Capsicum,chopped - 1

Onion - 1

Tomato(optional) - 1

Grated mozzarella cheese - 1/2 cup

Pizza sauce or any tomato based sauce - 2 tsp

Italian herb of ur choice - 1 tsp

Red chilli flakes - 1 tsp

Salt - 2 pinches

oil - 2 tsp

Method

  1. Heat milk until lukewarm,dissolve sugar and yeast. Let it rest for 10 minutes. After 10 minutes the mixture would have been raised to frothy, proving that the yeast is active. If not,your yeast is not active and use active yeast
  2.  
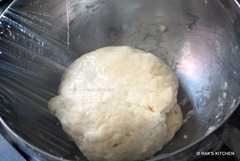
  3. Meanwhile, take flour in a large bow and make a dent in the middle. Add salt, oil and the yeast mixture in the dent and make a smooth pliable dough. If sticky sprinkle little more flour,if too dry sprinkle some water. The dough should be smooth and pliable.
  4.  
  5. Let it rest for 1 hour, wrap the bowl with cling wrap. After an hour the dough should have been raised. Punch it down and knead to make it smooth.
  6. DSC_7424 DSC_7432
  7. Make equal sized balls and arrange in a greased baking tray.Meanwhile prepare the filling. Heat a pan with oil and fry capsicums,tomato and onion for just a minute. Cool down and add sauce, cheese, Italian seasoning, salt and chilli flakes . Mix well.
  8. DSC_7428 DSC_7436
  9. Flatten the prepared dough balls and keep a small lemon sized ball of the filling.
  10. DSC_7437 DSC_7443
  11. Pinch the edges towards centre to cover the filling as shown in the picture. Arrange in the baking tray with the sealed side down. Make sure you have sealed properly,otherwise, the cheese will ooze out.
  12. DSC_7441 DSC_7442
  13. Pre heat the oven to 190o C and till then brush the buns with milk little and bake it for 18-20 minutes or until the buns start becoming golden brown on the top. Brush generously with butter after done.
  14. DSC_7445 DSC_7446

Notes

  • While sealing the buns, you can use water if you find it difficult to do so.
  • Adjust the baking time accordingly. Keep an eye on the buns after 15 minutes.
  • You can sprinkle white sesame seeds or even chilli flakes on the top before baking the buns.

Serve hot with tomato ketchup or chilly sauce! Enjoy it with your favourite drink!
Pizza-buns-1

Selasa, 20 Desember 2011

Peas masala recipe | Green peas recipe

Peas-masala-recipe
     I had no idea that peas masala could be so delicious if made at home, until I tried on my own. Before that, I always had tasted in restaurants, as an add on along with other gravies and never liked it that much. This is an easy recipe except the frying part, as it splutters a lot while frying, but I cover and fry the masala and overcome the spills. It goes well with roti or naan , even I eat it with steamed basmati rice or mild pulao 's side dish. I use frozen peas, we can also use fresh green peas and the dried ones for the same recipe.

I think the addition of roasted & powdered jeera and fenugreek/methi seeds adds on a great flavour to this masala. I love it. Thanks to the SIL who introduced this recipe. I just tweaked the method a bit for my convenience, otherwise no big changes. So here goes the recipe, I am sure you would love it!

green-peas-recipe

Green peas masala recipe


Recipe Cuisine: Indian  |  Recipe Category: Side dish
Prep Time: 5 mins    |  Cook time: 25 mins    Serves: 4

Ingredients

Green peas, fresh or frozen or dried* - 1 & 1/4 cups

Onion - 3

Tomato - 5

Ginger garlic paste - 1 & 1/2 tsp

Jeera & methi/fenugreek seeds - 1/4 tsp each

Red chilli powder - 1 & 1/2 tsp – 2 tsp

Dhaniya powder - 2 tsp

Garam masala powder - 1/2 tsp

Coriander leaves, chopped - 2 tblsp

Sugar - A pinch

Salt - as needed


*Soak over night and 1 cup is enough…

To temper

Oil - 2 tblsp

Cinnamon - 1 inch piece

Elachi - 1

Cloves - 2


Method

  1. Golden roast methi and jeera in few drops of oil in a pan. Powder it using hand mortar and pestle or you can simply crush it using a rolling pin. Chop onion and tomato roughly, fry them with a tsp of oil until the the tomatoes turn mushy. Cool and grind.I dint had GG paste, so I added 3 cloves of garlic and a piece of ginger along this frying.
  2. fry onion tomato-jeera
  3. Heat a small pressure cooker/pressure pan with the oil and temper with the items given under ‘to temper’ table. Add the ground onion tomato and fry covered in medium flame until it reduces in volume. Say 4-6 minutes. Add the masala powders and turmeric. Fry till oil separates.
  4. fry,add masalas
  5. Add the peas and add enough water (1 & 1/2 to 2 cups) and add salt and sugar. pressure cook for 2 whistles.
  6. add peas,cook
  7. Open once pressure is released and add the powdered jeera and methi( I had methi powder already) and just give it a boil, garnish with coriander leaves.
  8. add,boil
Notes
  • Better cover the masala while it is frying as it splutters a lot.

Serve hot with butter or cream topped on the masala, with roti or rice/pulavs, yummy!

Peas-masala

Kamis, 15 Desember 2011

VEG KEEMA PARATHA / SOYA KEEMA PARATHA

soya-keema-paratha

After my soya chunks curry, I try to cook few other soya chunks recipes and this is one of the try. This is not soya chunks but its smaller than that, tiny bits called Soya Chura. I bought the MDH soyatein brand, if you want to know. I got this inspiration of making parata when I saw this in Ananda bhavan menu. They had made it with maida and it was square in shape too. I made it just like any other stuffed parathas. Used atta for making dough.

I just made this with lots of masala powders to overcome the usual soya smell. And since the size of this soya chura is really tiny, I think it blends well with the masalas coz of that. You can even try this soya keema masala as such as accompaniment or simply wrap in roti as well.

veg-keema-paratha-recipe

Soya Keema paratha recipe

Recipe Cuisine: Indian  |  Recipe Category: Lunch
Prep Time: 15 mins    |  Cook time: 20 mins    Serves: 5

Ingredients


Soya ‘chura’  3/4 cup 
Onion  1 
Tomato  2 
Turmeric  1/4 tsp 
Red chilli powder  1 tsp 
Garam masala powder  1 tsp 
Dhaniya powder  2 tsp 
Coriander leaves,chopped  4 tblsp 
Ginger garlic paste   1 & 1/2 tsp 
Salt  As needed 

To temper

Oil 1 tblsp
Fennel seeds/ Soambu 1 & 1/2 tsp

For the dough

Atta 1 & 1/4 cup
Oil 1 tblsp
Warm water as needed
Salt As needed

Method

  1. Prepare dough and let it rest while we prepare the soya keema. Boil enough water and soak the soya chura for 10 minutes. Drain,wash it and squeeze the water. Repeat the process once again but with salt this time.
  2. soya1
  3. Heat a pan with oil and season with fennel, add onion and fry for 2 minutes. Add ginger garlic paste and fry till raw smell goes off. Add chopped tomatoes and salt. Fry till soft.
  4. soya2
  5. Add all the powders and fry till the masala turns mushy. Add the squeezed soya churas.
  6. soya3
  7. Add 1/4 cup water to blend the masala well with the soya and cook for 8 minutes (or until water evaporates)in low to medium flame to make a dry soya keema.
  8. soya4
  9. Roll a thick roti and spoon generous amount of the keema and roll into parathas carefully. Cook both sides until golden brown in medium flame with oil drizzled over.
  10. soya5

Notes

  • Soaking and squeezing out twice is a very important step to overcome the soya smell. so follow the step.

Serve hot with onion raita, the best combo. Tastes great if eaten as such too, but best with the raita!

veg-keema-paratha

Senin, 12 Desember 2011

GOBI MASALA RESTAURANT STYLE RECIPE


Gobi masala restaurant style recipe

     I usually make cauliflower curry for Aj who loves cauliflower a lot, that he would even eat it every day as accompaniment for his lunch. He is that much crazy about cauliflower. Even I like cauliflower, there is a fair reason behind it. My mom never buys cauliflower or cooks cauliflower at home. That’s coz, they hate the small worms inside the cauliflower,which is used to be a common thing those days. So she treats that veggie as ‘Non-veg’. So only very few times I had tasted cauliflower in restaurants, when I am with my friends.
      Then after marriage, things changed, thankfully they do buy and cook cauliflower. And when I started cooking, I enjoyed cooking cauliflower in different forms : gobi paratha, aloo gobi, cauliflower kurma, curry, fries, gobi 65 or add it in briyani or kurma. Hope this is enough to proveSmug. But the only thing what I don’t like is the cauliflower we get here is so very different from the ones we get in India. Here it gets cooked so quick and becomes very soft and turns mushy easily. I like it more on firm and crunchy side. Still nothing stops. This gobi masala recipe is one of Aj’s recent favourite cauliflower recipe. Once when we ordered lunch, this one came as an accompaniment and I was wondering, why I have not tried this way so far. And very soon I tried and it came out even better than what we tasted. My kid just loved it and I too loved it. It goes very well with roti or naan, even kara kuzhambu too or mild pulaos too. With all these masalas, it tastes awesome..!won’t it?

gobi-masala+restaurant-styl

Gobi masala restaurant style recipe

Recipe Cuisine: Indian  |  Recipe Category: Side dish
Prep Time: 10 mins    |  Cook time: 20 mins    Serves: 3

Ingredients

Cauliflower - 1 medium flower

Onion - 2 , finely chopped

Tomato - 2 , Finely chopped

Ginger garlic paste - 1-2 tsp

Garam masala - 1/2 tsp

Red chilli powder - 1 tsp

Dhaniya powder - 2 tsp

Turmeric - 1/8 tsp

Tandoori or biryani masala
powder (optional) - 1/2 tsp


Coriander leaves, chopped - 2 tblsp

Curry leaves - 1 sprig

Salt - As needed


To Temper

Oil - 2-3 tblsp

Fennel - 1 tsp

Cinnamon - 1 inch piece

Elachi - 1

Clove - 1


Method

  1. Heat a pan/kadai with oil and temper with the items given under ‘To temper’ table. Add curry leaves,chopped onions and fry till transparent. Add Ginger garlic paste and fry for 2 minutes in medium flame. Add the chopped tomatoes, salt and fry till it becomes  soft and mushy.
  2. gobi-step1
  3. Add all the masala powders and fry in medium flame for 3 minutes or until raw smell goes off.
  4. gobi-step2
  5. Add the cleaned cauliflower florets, cut into bite sized pieces and add 1/4 cup water and mix well.
  6. gobi-step3
  7. Cook covered in medium flame until cauliflower is done. Add coriander leaves and fry for 3-5 more minutes. Add more oil if needed.
  8. gobi-step4

Notes

  • Clean cauliflower properly before cooking it by immersing it in hot water with salt for 10 minutes.
  • Do not over cook as it will turn the cauliflower mushy.
  • Add more oil while frying at the last if it gets stuck to the kadai.

Transfer to the serving bowl. Serve with roti or any other rice, as accompaniment for it.
Gobi-masala-recipe

Kamis, 08 Desember 2011

CARROT SOUP RECIPE

carrot-soup

   I am adding a ‘Soup’ category in my blog first time now. Coz, this is my first ‘Soup’ post. Yes, I am not a soup person, no body in home either. The reason is I am very lazy to make soup, but can have it if someone makes for me and will be more than happy to have it. Good for my weight and health too… My mom makes some soups back home, in which carrot soup will be more in frequence. She adds tomato and wont add butter in her soup. But I tried this way from a cookbook.
   I love sweet corn soup and tomato soup more than carrot soup, sure will try those and post in recent future. And the best thing I love in soup is the crouton. Also I would love to pair soup with a bread toast. Wish I could make soups more often and develop a love with it, for my health sake at least. If only I have this habit, Aj would consider having soup. I have tough times in making him drink a soup even if he has cold and a hot bowl of soup with pepper will be comforting him.

carrot-soup-recipe

Ingredients

Carrots 3
butter 1 tblsp
pepper 1 tsp
salt As needed
Bay leaf 1

Method

  1. Wash carrots and cube them roughly. Heat a pan with butter and add the bay leaf and fry carrots in medium-low flame for 3-4 minutes. Add salt and pepper.Give it a stir. carrot-soup-step1
  2. Add 3/4 cup of water and cook in medium flame until the water reduces(3-4 minutes). carrot-soup-step2
  3. Cool down and blend it into a smooth paste. ( save the bay leaf before grinding)carrot-soup-step3
  4. Add 1 & 1/2 cups of water to it and boil along with the bay leaf  until you get the desired consistency. carrot-soup-step4
Adjust the salt and pepper and garnish with bread croutons and serve piping hot!!
carrot+soup
Posted using FotoBlogr.

Rabu, 07 Desember 2011

Minggu, 04 Desember 2011

VENDAKKAI PORIYAL, DAL TADKA RECIPE

 
    Vendakkai poriyal/ ladies finger poriyal is the one I love to mix and eat with rice and sesame oil/ghee. It needs some time and patience for cutting and sautéing the ladies finger/okra. But I love it so much to do and as well as eat. When I was new for cooking, it used to mess up with this without knowing the technique. Now I think I can make it easily and wonder how I messed up with this easy recipe.
I used to be a very bad eater until I finished my school. And when it comes to vegetables, my mom sure had a tough time making me eat . I never touch the accompaniment vegetable in my plate. My mom do all the possible things to make me eat, like she always mixes the vegetable accompaniment like poriyals, kootu and all those with a small portion of rice and ghee and before sambar or any gravy with rice, I have to eat that. Now also after I came here and left alone, I rarely eat veggies since no one is there to question me. And now a days I tell myself that I should take care of my health only myself and try do the same what my  mom used to do and hope to continue this Happy.


Ingredients

Ladies finger/vendakkai 1/2 kg
Sambar powder 1 tsp
Turmeric 1/8 tsp
Coconut, grated 1/8 cup
Salt as needed
Sesame oil 2 tblsp
To temper
Oil 1 tsp
Mustard 3/4 tsp
Urad dal 1 tsp
Curry leaves 1 sprig


Method

    1. Heat the pan/kadai with oil and temper with the items given under the ‘To temper’ table. Add the finely cut ladies finger(refer notes) and keep frying for 6-8 minutes in medium flame, stirring in between. Add sesame oil generously to reduce the stickiness. At a point the volume will reduce and the colour changes to transparent green.

    2. Now add salt, turmeric, sambar powder and mix well. Lastly add the coconut and fry for a minute. Transfer to the serving bowl.

   
     Serve as an accompaniment for rice with sambar or any gravy. I had with brinjal/drumstick kuzhambu. Yum yum!


Notes
  • Wash the ladies finger and pat dry them well before you cut. No water should be there in the ladies finger. It is better to wash and dry them prior so that no moisture is there. Check for old ones by breaking the tail end of the ladies finger. If it breaks crisp, then you can use it. Otherwise discard. Cut the head and then slice them in to thin circles.
  • When you start frying, the ladies finger will be sticky for a while, so do not panic,just add sesame oil and fry. Sesame oil is good for health so don’t bother adding it generously.
  • Once the ladies finger gets cooked by adding frying it with oil the stickiness will be almost reduced and then too after adding sambar powder it will completely go off.
  • Just make sure you fry the vendakkai properly in oil and cook it until colour changes to a transparent green. 

SIMPLE DAL TADKA RECIPE WITH MOONG DAL


   This is a simple tadka dal recipe which you can make in jiffy for a comfort meal. Goes well with steamed rice and a North Indian subzi. Me and my kid eat this very often. I love it with basmati rice the best! The garlic adds a great flavour to the dal. Do try you will simply love it! Being a south Indian, our festive meal will always have paruppu, which we cook moong dal or toor dal with turmeric and temper with mustard urad dal, asafoetida, green chillies and curry leaves. It is the simple and best dal which has completely different flavour. But I love that too with rice and ghee. But this one is quite different and flavourful.

Ingredients

Moong dal/ paasi paruppu 1/2 cup
Tomato 1
Red chilli 1
Turmeric 1/8 tsp
Salt As needed
To temper
Ghee 2 tsp
Jeera/cumin seeds 1 tsp
Red chilli 2
Garlic 4 pods, crushed
Coriander leaves,
finely chopped
1-2 tblsp

  Method

    1. Pressure cook moong dal with chopped tomato, turmeric and one red chilli for 3 whistles. Once done, mix salt to it and temper with the items given under to temper table in order. Make sure you fry the garlic until golden brown for a nice flavour.


Serve with hot steaming rice with any vegetable sabzi!


Blogger news

Blogroll

About