Pages

Diberdayakan oleh Blogger.

Selasa, 29 April 2014

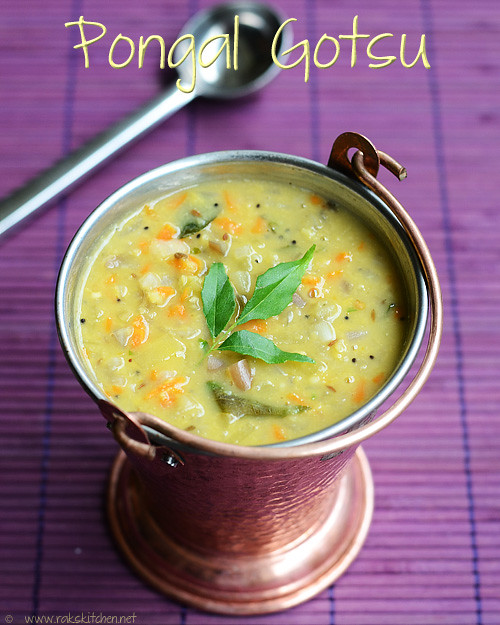
EASY PONGAL GOTSU RECIPE | SIDE DISH FOR PONGAL

easy pongal gotsu
I have a brinjal gosthu recipe which uses a powder that has to be added to it. My MIL’s chidambaram brinjal gosthu recipe. Since no one likes brinjal in our family, my MIL grinds the brinjal coarsely and makes that gosthu. The speciality is that roast ground powder and I cant match her gosthu’s taste even now. She makes the consistency and taste perfectly. Even the brinjal haters of our family eats that. She makes it for idli only. My mom’s side gosthu-s are so simple and easy, yet its a kind of tasty. She makes it with ease. No grinding part, no tamarind. And there are quite a few variations in it. This is one my mom makes with only brinjal for pongal as pongal gotsu. But when I came to Singapore, once my sister in law here made this one which is very similar to moms with potato and carrot. So now a days I make a this for pongal. You might have seen this in my pongal post with potato and carrot alone and this post in my breakfast menu. I got few message and mails if I had posted it or not. I think even after this, I cant delay posting this one. Though its simple and easy to make, it tastes perfect for pongal and even idli dosas.
pongal-gotsu-recipe

And before going to the recipe, I have an exciting news to shareParty. My recipes have been published as a supplementary book in the popular Kungumam THOZHI tamil magazineCool. I spent a quality time in this and took it serious and made it possible to send it very short period of timeBig Grin. Though I may not share all the recipes, I will sure share few interesting recipes from this collection, so stay tuned!!
kungumam thozhi

Pongal gotsu recipe

Recipe Cuisine: Indian  |  Recipe Category: Breakfast
Prep Time: 15 mins    |  Cook time: 20 mins    Serves: 4

Ingredients


Brinjal, small  3 
Potato  1 
Carrot, small  1 
Onion  1 
Moong dal / paasi paruppu  1/2 cup leveled 
green chilli  4 
Turmeric (optional)  1/4 tsp 
Coconut oil  2 tsp 
Salt  As needed 
Coriander leaves, chopped  2 tblsp 


To temper

Oil 2 tsp
Mustard 3/4 tsp
Urad dal 2 tsp
Jeera/ cumin seeds 1 tsp
Curry leaves 1 sprig

Method

  1. Pressure cook dal for 3 whistles with enough water. We usually do not mash the dal for this gotsu, if you want you can. But my mom says we should cook without mashing it for a nice texture and flavor. Meanwhile, chop finely onion and other veggies. Carrot very fine, potato chop finely and brinjal can be little bigger comparatively.1-pongal-gosthu 
  2. Heat a kadai with oil and temper with the items given under to temper table. Add onion and fry till transparent.2-pongal-gosthu 
  3. Add the chopped veggies and add little salt. Cook in medium flame for 2 minutes. 3-pongal-gosthu
  4. Add 2 to 2 & 1/2 cups of water, turmeric if adding and required salt and bring to boil.4-pongal-gosthu 
  5. Simmer for 4-5 minutes or until the deisred consistency is reached. More or less a sambar consistency. My mom makes it watery too. Garish with the coriander leaves, coconut oil and switch off the stove.5-pongal-gothsu 

Notes

    • You can make this with brinjal alone or with potato and carrot alone too.
    • You can add a tblsp of idli dosa batter towards the end to make the gravy thicker and it adds a nice taste too.
    • You can top with sesame oil and eat.
    • You can add a tomato in the same recipe along with the veggies.
    • Some moong dal give so much volume after cooking, so use lesser when its a bigger variety. Mine is very tiny grown in our relatives fields and cooks at no time. Gives less volume though.

Serve with idli, dosa or pongal the best. Easy and yummy gotsu for your main dish!

easy-pongal-gotsu

Minggu, 27 April 2014

Hakka noodles, Chilli paneer dry and mango sago - Lunch menu 35

Hakka noodles chill paneer mango sago

After a weekly shopping, I wanted to make a different from my usual south Indian lunch menu, so asked Vj what to make. He suggested hakka noodles and chilli paneer dry. So I did the same with his favorite mango sago dessertBlushing. Though noodles wont be that filling, when paired with paneer side dish, it will sure be filling and the mango sago dessert will make the meal complete. Since mango season has started, I got few ripe banganapalli mangoes from Mustafa yesterday and thought of making this dessert today. Its very easy too, so made this weekend.

Lunch menu 35 - Hakka noodles, Chilli paneer and Mango sago

Recipe Cuisine: Oriental/ Indian  |  Recipe Category: Lunch
Prep Time: 1 Hr 30 mins    |  Cook time: 1 Hr    |  Serves: 3
  1. Soak sago 1 hr before you are going to cook. I first prepared the dessert and kept refrigerated. Its better to make the dessert first and keep it in the fridge as it is supposed to be taken cold.
  2. Finely chop some ripe mangoes for mango sago and keep it refrigerated too.
  3. Chop veggies for hakka noodles, spring onion, capsicum for both hakka noodles and chilli paneer. Keep all the other ingredients like coriander leaves, spring onion for garnish.
  4. Meanwhile you can side by side boil water and cook noodles, keep aside.
  5. Heat oil and prepare batter for deep frying paneer cubes. Deep fry and keep aside.
  6. First prepare hakka noodles and keep in a hot pack.
  7. Then toss chilli paneer and serve hot your family as these are supposed to be consumed hot. Lastly treat your family with the dessert, with freshly chopped mangoes.

Simple lunch with hakka noodles, chilli paneer dry and mango sago dessert.

Hakka noodles chill paneer mango sago

Check out the recipes
  1. Hakka noodles recipe
  2. Chilli paneer dry recipe
  3. Mango sago recipe
If you want you can add on fried rice also in your menu and make the chilli paneer as chilli paneer gravy too.
Happy Sunday! Happy

Kamis, 24 April 2014

RASPBERRY CHEESE CAKE RECIPE (NO BAKE)

no-bake-raspberry-cheesecake
I have tasted cheese cake only once before in a buffet and I was not liking that much. From that time I had no impression towards cheesecakes and I never felt like trying. While I went for weekly grocery shopping near Vj’s office, I saw fresh blueberries, strawberries and raspberries in punnets. I was so much tempted, though I am not a big fan of both strawberries and blueberries – though I like the flavours, not the fresh onesBlushing. But raspberry has been always my favorite flavor and the name raspberry by itself is so fascinating to me. So I bought each one punnet. So when I was thinking about making lemonade or some baking with these, I thought of trying no bake rapsberry cheesecake and found this recipe very easy and suitable for me. I used fresh raspberry sauce obviously. Its very simple and I am sure you will like if you like cheese cakes.
no-bake-cheese-cake-recipe

No bake Raspberry cheesecake recipe

Recipe Cuisine: Continental  |  Recipe Category: Dessert
Prep Time: 12 hr    |  Cook time: 10 mins    Serves: 2

Ingredients


Cream cheese  3/4 cup 
Powdered sugar  2 tblsp 
Vanilla essence   1/4 tsp 
Digestive biscuits or any plain biscuits (I used my short bread cookies)  4 
Melted butter (optional)  1 tblsp 

For sauce

Raspberries 1/2 cup
Sugar 1/4 cup
Lemon juice 2 tsp
Lemon zest A pinch
Vanilla essence 1/2 tsp

Method

  1. Place the biscuits in a ziploc bag and crush it using rolling pin, evenly. I made it as individual servings, so take any small glass or ramekins and spread the powdered biscuits evenly. Press it to set it. You can add melted butter if you want.
  2. 1-powder
  3. Keep cream cheese outside the fridge for 10 mins prior and place it in a bowl along with vanilla,sugar.
  4. 2-cheese
  5. Beat well in high speed with whisk attachment (or you can use a whisk and do with your hands too) until its creamy and light. Spoon it over the biscuit layer and refrigerate atleast for 5-6 hours or over night covered with a lid or cling wrap.
  6. 3-cream
  7. For sauce, place raspberries and sugar in a blender and grind just to make it juicy, no need to grind too much, just for 10 sec or so.
  8. 4-set
  9. Heat this until it boils, becomes shiny and switch off the stove. Add lemon juice, zest and vanilla and mix well. Cool down.Spoon this to the set cheese cake and refrigerate again for few hours before serving.
  10. 5-set

Notes

    • You can use fine grain sugar too with cream cheese, but powdered sugar gives more softer and smooth texture.
    • You can prepare this the before day and serve the next day.
    • You can use tinned raspberries as top layer, no sauce making is needed.
    • You can use digestive or salted biscuits as base too.
    • Using lemon, lemon zest when using fresh raspberries gives good flavor.

Perfect, exotic, rich dessert is ready to surprise your guest or to treat yourself. You can do the same with strawberries too.
raspberry-cheese-cake-recip

Selasa, 22 April 2014

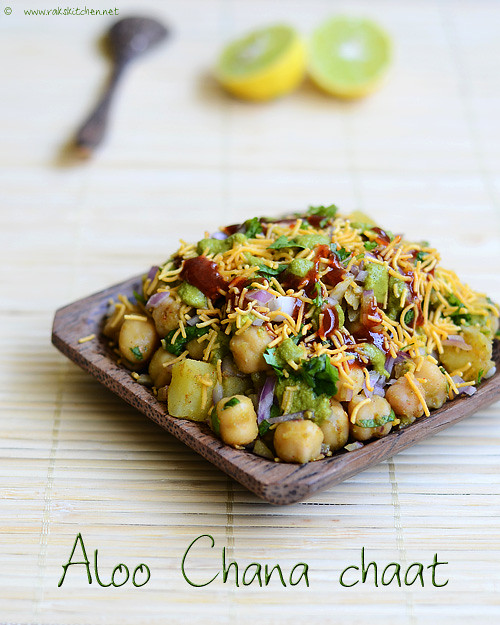
ALOO CHANA CHAAT RECIPE | CHANNA CHAAT RECIPE

aloo-chana-chaat-recipe
I ate aloo chana chaat in Mirchi restaurant at Esplanade here in Singapore. I love that restaurant for the tasty food, ambience, location – yes location because, it is a life saver when visitors come and we take them to esplanade /Merlion and after the long roaming we will sure be tired and hungry. This restaurant saves us those times. Though I am not a big fan of their aloo chana chaat, I always wanted to try at home as I know I can make it betterWhistling. I make channa masala or pindi chole once a week for Aj’s lunch box and I save some cooked plain channa / raw soaked channa for chaat and have had so many times, only that I have not clicked and posted here. Last two weeks I planned to picture but again I kept postponing. So today is the day, I made, clicked and then had it Winking. There are many versions, here is my version anyways.
chana-chaat-recipe

Aloo chana chaat recipe

Recipe Cuisine: Indian  |  Recipe Category: Snack
Prep Time: 15 mins    |  Cook time: 15 mins    Serves: 2

Ingredients


Chana (cooked)  1 cup 
Potato  1 
Onion  1 
Sweet chutney  As needed 
Green chutney   As needed 
Lemon juice  1 tsp 
Sev   As needed 
Chaat masala  1/2 tsp 
Red chilli powder  1/2 tsp 
Chopped coriander  2 tblsp 


Method

  1. Cook potato, peel and cube it into bite sized pieces. I prick in 2 –3 places and microwave for 2 minutes, in between turning it upside down. Chop onion very finely. Gather all the ingredients and keep ready. Place channa, potato in a mixing bowl, add onion, red chilli powder, chaat masala, lemon juice, both chutneys and coriander leaves. 1-aloo-chana-chaat
  2. Mix gently with a salad spoon and lastly add the sev lastly. Top with more chutneys and sev if desired and serve immediately. 2-chana-chaat-recipe

Notes

    • You can skip onion in this recipe. You can also add tomato along with onion.
    • Chaat masala is the only thing for salt, so add it according to your taste.
    • I love more sweet chutney in my chaat, so add chutneys according to your preference.

Yummy and a filling homemade chaat is what you have in your hands, why to go to chaat stands to eat it out?
aloo-chana-chaat

Sabtu, 19 April 2014

South Indian Breakfast menu 9 - Khara paniyaram

khara paniyaram, vendhaya dosai, podi, chutney
It was a busy long weekend here, with lots of shopping for my birthdayWinking. Though lots of cooking is there, I did not clicked anything for lunch menu series as I almost repeated my usual menus, so didn’t plan for a new one and click. So I clicked this breakfast menu yesterday. I ground for vendhaya dosai and adai on friday – vendhaya dosai, for saturday and adai for friday dinner. As friday was holiday and we went for shopping, we had some evening snacks at a restaurant and when we came back home, no one was that hungry. So I knew, no one will eat properly and reserved some adai batter without adding onion and saved it in fridge for the next day. So the next day morning, I made vendhaya dosai and khara paniyarams with the reserved adai batter for breakfast. We usually make khara paniyaram along with sweet paniyaram for dinner, but this one is to make use of the batter. I added some bits of fresh coconut and it was awesome.

Khara paniyaram, vendhaya dosai, Chutney, Podi

Recipe Cuisine: Indian   |  Recipe Category: Breakfast
Prep Time: 12 hr     |  Cook time: 45 mins    |  Serves: 4

  1. The before day, soak for vendhaya dosa and for khara paniyaram. For khara paniyaram, you can soak early morning on wake up and grind after 3 hrs and make in the morning too. But this saves time and will be handy in the morning, making your job easy.
  2. Grind for dosa in grinder and keep overnight for fermentation. Grind for khara paniyaram and keep for an hour outside and then keep refrigerated.
  3. Peel garlic for the poondu milagai podi. Grate coconut for chutney and milagai podi as well.
  4. Temper for coconut chutney. Roast chilli for poondu milagai podi, cool and first grind this. Grind coconut chutney and mix it with the tempered items. (I roasted some channa dal and used ripe chilli for grinding this coconut chutney)
  5. When your family is ready, heat the dosa pan and paniyaram pan side by side and make for them and serve hot.

Breakfast with vendhaya dosa, khara paniyaram, poondu milagai podi and chutney!


Get the recipes by following the links below:
  1. Vendhaya dosai recipe
  2. Poondu milagai podi recipe
  3. Khara paniyaram recipe (scroll down)
  4. Coconut chutney (ginger flavored)
For vendhaya dosa, poondu milagai podi is the perfect side dish. I love it to have it with buttermilk or fresh curd too along with this. For this summer, vendhaya dosa is good for cooling your body too.
Check this sponge dosa recipe and sweet paniyaram recipe too.
Happy Sunday everyone! Cool

Kamis, 17 April 2014

SCHEZWAN BABY POTATOES RECIPE (GRAVY) | SIDE DISH FOR NOODLES/ FRIED RICE

schezwan-baby-potatoes        
For our wedding anniversary, we went to Copper Chimney restaurant here in Singapore for lunch. I have never been there before, so thought of giving it a try. So we ordered this Schezwan baby potatoes as it sounded very tempting. And as it sounded, looked, it tasted great too. We all loved it. And immediately I added this recipe to my to try list. And when I googled for the recipe, I found this one interesting and adapted it to make this recipe. It turned our really good and I was happy that I got another interesting side dish for fried rice. Though the recipe calls for deep frying the baby potatoes, I skipped it. If you are comfortable with deep frying, please go ahead and try. Both ways it must be awesome tasting. This will be perfect side dish for fried rice or hakka noodles
schezwan-baby-potato-gravy

Schezwan baby potatoes recipe

Recipe Cuisine: Indian  |  Recipe Category: Lunch - Side dish
Prep Time: 15 mins    |  Cook time: 25 mins    Serves: 4

Ingredients


Baby potatoes  25 
Onion  2 
Garlic (Big variety)  4 pods 
Red chilli  15 
Soya sauce  1 tblsp 
Tomato chilli sauce(Optional)  1 tblsp 
Sugar  1 tsp 
Corn flour  2 tsp 
Spring onion (green part, chopped)  3 tblsp 
Red chilli for tempering  2 
Salt  As needed 
Oil  1 tblsp 
Schezwan pepper (optional)  1 tsp 
Lemon juice/ vineger  2 tsp 

Method

  1. First soak the red chillies in a real hot water. Mean while it is getting soaked, peel the potatoes. You can cook in pressure cooker and later peel off the skin, but I was not sure if I could cook it perfect for this, so chose to boil it. Its up to you to decide.
  2. 1-schezwan
  3. Bring enough water to boil and add the peeled potatoes and little salt. Boil it until its cooked well from inside, it should be soft. Once done, drain it and keep aside.
  4. 2-schezwan
  5. Place the soaked chillies with little water and grind to a smooth paste.
    3-schezwan
  6. Heat a broad pan with oil, tear the chillies, add it to the hot oil. Add pepper (I used our normal black pepper) followed by finely chopped garlic, give it a fry. Add finely chopped onion and fry till transparent.
  7. 4-schezwan
  8. Add ground chilli paste, soya sauce, chilli tomato sauce, sugar, and give it a fry. Add the cooked potatoes. Fry for a minute in medium – low flame.
  9. 5-schezwan
  10. Add enough water to immerse the potatoes, add required salt and bring to boil. With little water, dissolve the corn flour and add to the boiling gravy.
  11. 6-schezwan
  12. When it thickens and becomes shiny, squeeze the lemon and mix well,  add the chopped spring onion and switch off the flame.
  13. 7-schezwan

Notes

    • Cooking the potatoes perfectly is very much needed for this recipe. Then only it will be blending well with the gravy and be juicy.
    • Take care not to overcook the potatoes, otherwise it will get broken and spoil the look of the gravy too.
    • If you want to deep fry the potatoes, then  peel, parboil, drain, pat dry and then fry until golden in hot oil and then use in the recipe.
    • You can add cubed capsicum too in this recipe.
    • You can increase the chilli number according to the spiciness of the chilli variety and the spice level you want.
    • You can add black pepper powder towards the end for extra punch.

Serve hot with fried rice. Goes perfect with fried rice, hakka noodles or even with any flat breads. Vj had it with roomali roti and it was good he said.
  schezwan-baby-potatoes-gravy

Selasa, 15 April 2014

MOR MILAGAI RECIPE | SUMMER SPECIAL

mor-milagai-recipe
I love love mor milagai as side dish for curd rice and mainly pazhaya sadam Tongue. In my childhood days, during summer, my mom purposely keeps extra rice in the night for the next day’s pazhaya sadam. And some times, if its less and only for one person, me and my mom will try to sneak and have it without each other’s knowledge. That much we love it. And my mom has sundakkai vathal, kothavarangai vathal, mor milagai, chinna vengayam, fresh cut raw mango and any pickle. Atleast 3-4 side dishes will be there. Mostly mom makes mangai thokku. Those days, pazhaya sadam – we call it as pazhayadhu, will be so flavorful. I really miss it these days. Even I keep pazhaya sadam and try eating next day, but it never matches those good old day’s taste Crying. I am not sure why. Is it because of the rice? or there is some other factor. Even my mom says its not the same these days.
Its best for beating the heat in summer as its a great body coolants and has lots of goodness in it. So do not waste the rice or refrigerate it for next day. Make it as pazhaya sadam. How to make it? I was wondering if I have to make a separate post for itWorried. No need, its very simple and easy as a child’s play. Just break roughly the cooked left over rice if its caked, add lots of water so that the water level is 2-3 inches above the rice. Keep covered overnight and taraaa…Cool Pazhaya sadam. Next day, you can just mix the rice with your clean hands and drain water, add salt and a dash of buttermilk, drink the water too alone. Or eat it as such thanniyum sadhamum (with salt, buttermilk added). Sometimes, me and my mom drain and save the water for drinking as mentioned above and make curd rice with pazhaya sadam. My mom sometimes keeps in clay vessels/ containers and it will be so cool and goes through the food pipe so cool and comfortingHappy. And next to mor milagai, my best side dish is chinna vengayam for pazhaya sadam. I love the part of cutting the onion in the rim of the bowl/ plate by pressing against it and make it small pieces and eat it with rice. Forger about the thing that you smell like onion after thatSick.
pazhaya-sadam-with-mor-milagai
I took all the steps for this post when I made it this time before in laws came. Since I was bit busy with them and we went to lot of places, I saved the pictures somewhere safe and now couldn’t find it. Too bad I was cursing myself for that when I heard that maami(MIL) making mor milgai. I was happy that I got a chance to get pictures, but wait, who will take pictures and send me. BILs both hold DSLR, but I was bit hesitant to disturb them in their busy schedules. But thanks to my younger co-sis and  BIL, when I said I want pictures, they took many pictures, more than I would take, in different angles and sent it to me. How sweetLove Struck. But then when I saw all the pictures, I realized that what I made was with the oosi milagai (a thin long variety of the chilli) but maami made with the short stout ones (which is called koda milagai in Thanjavur). I thought I would take the dried chilli what I made here is there for taking final clicks. So I got these as packed parcel, through someone ;) I was so happy that I could make a post. I will sure update if I find my version of steps for this post in future.

Mor milagai recipe

Recipe Cuisine: Indian  |  Recipe Category: Side dish
Prep Time: 20 mins + drying time 10 days    |  Cook time: 5 mins    |  Makes: 2 cups

Ingredients


Chilli  4 cups 
Curd  4 cups 
Salt  4 tblsp or  as needed 


Method

  1. Clean the chilli well and if you want you can cut the stalk of it, not fully though but leaving a little as shown in the picture. When I did, I left the whole stalk in it as I like too. Just slit a little along side or at the bottom of the chilli. This is for salt and buttermilk to get inside easily while soaking. Beat curd (you can use the sour left over curd for this and add water if too thick) and mix salt and these chillies well.1-mor-milagai
  2. Keep closed overnight and next day, take out the chilli alone and dry in hot sun in a large, broad plate or a muram, spread well. Let it dry for the whole day.2-dry-mor-milagai
  3. By evening, again put the chillies back in the buttermilk, mix well and keep closed overnight. Next day, repeat the process. Likewise, repeat drying until all the buttermilk gets into the chilli and then just keep drying the chilli alone in sun for few days in hot sun until the chillies are dried up completely.3-dried-mor-milagai
  4. Store in a closed container and fry when every needed. Heat enough oil and fry the chillies until deep dark brown. I like mine even if its blackened but it tastes great in both ways.4-mor-milagai-fry

Notes

    • If the sun is super hot, 10 days is enough I think to dry, but it took some time for me when I made it here in Singapore, so it depends on the hot sun.
    • When you dry the chillies, do not keep the buttermilk in hot sun full day.
    • Salt quantity is purely your choice, but atleast it whould be enough to take out the spiciness of the chilli.
    • When I made here, since its indoor, the smell will not be so pleasant, Aj started complaining. But my MIL and mom says, it smells nice even while its soaking and drying. :)

Goes perfectly well with curd rice or pazhaya sadam. Also you can use this for tempering mor kuzhambu.

mor-milagai


Blogger news

Blogroll

About