Pages

Diberdayakan oleh Blogger.

Rabu, 23 Juli 2014

Soya chunks biryani | Soya chunks recipes | Meal maker biryani

soya-chunks-biryani-recipe 
Inspite the numerous health benefits, my family does not like to eat soya chunks. Aj is fine with soya chunks curry. I am a great fan of soya chunks in kurmas. But other than us, no one likes it. Also they  will ask me weirdly that I am cooking and eating soya chunksOh go on. I too rarely cook but as Vj doesnt eat. So after a short break, I bought this Manna soya chunks pack in Mustafa. Unlike the small soya chunks I buy regularly, this was the medium sized which I am handling for the first time. But after making this biryani, the result was perfect, so I am sure I will use this pack effectively. And this Biryani recipe, though I wanted to follow a supplementary book’s recipe, I ended up making biryani in a way that I learnt from a friend (sukku kuzhambu, vada curry and pattani kuzhambu fame). She uses this recipe to make vegetable biryani. It will be awesome. But I adapted that too for my convenience. And it turned out really good and perfect.
meal-maker-biryani-recipe

Soya chunks biryani recipe

Recipe Cuisine: Indian |  Recipe Category: Breakfast
Prep Time: 35 mins    |  Cook time: 25 mins    Serves: 2

Ingredients


Basmati rice  1 cup 
Soya chunks  30 
Onion  1 
Tomato, small  1 
Curd  3 tblsp 
Turmeric powder  1/4 tsp 
Red chilli powder  1 & 1/2 tsp 
Green chillies  3 
Mint leaves  15 
Coriander leaves, chopped  3 tblsp 
Ginger garlic paste  1 & 1/2 tsp 
Ghee  1 tsp 
Salt  As needed 

To temper

Ghee or oil 3 tblsp
Cinnamon 1 inch piece
Bay leaf 1
Cloves 1
Cardamom 1
Jeera/ cumin seeds 1 tsp


Method

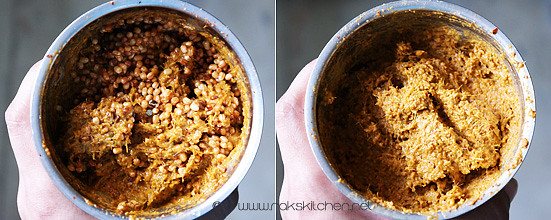
  1. Soak basmati rice in warm water for 30 mins atleast. I used medium sized soya chunks (it may look different in size because of camera lens).
  2. 1-soak
  3. Boil water with 1/4 tsp salt and add the soya chunks. Cook in medium flame for 10 minutes. 2-boil
  4. Rise with cold water and squeeze it till dry and again repeat it. Keep aside.
  5. 3-rinse
  6. I cut each chunk to two, its optional. Keep all the other ingredients cut ready. Then after the rice is soaked for 30 mins, boil 5 cups water and add rice to it.
  7. 4-cut
  8. Let it boil for 5 minutes or until its 90% done. Add few mint leaves torn to this, add little salt and a tsp of ghee.
  9. 5-cook
  10. Toss and keep aside. Heat a small pressure cooker with ghee. Temper with items given under ‘To temper’ table in order.
  11. 6-mix
  12. Add sliced onion, fry till transparent. Add soya chunks, ginger garlic paste and fry until dry for 2 minutes in medium flame.
  13. 7-fry
  14. Add tomato, salt, red chilli powder, green chilli and turmeric. Fry until tomatoes become soft.
  15. 8-tomato
  16. Add curd, remaining mint leaves and fry for 2 more minutes.
  17. 9-curd
  18. When it becomes thick, add 1/4 cup water and bring to boil.
  19. 10-gravy
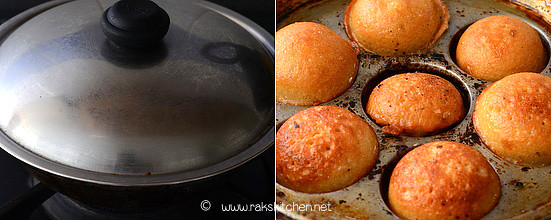
  20. Add the cooked rice and mix evenly. Flatten with back of ladle and cover with cooker lid (I do with the pressure valve). I can keep the flame really low in my stove burner, so how much ever its is possible keep the flame low and cook for 12 minutes. You can keep over a dosa pan too if you cant put flame in low.
  21. 11-rice
  22. After 12 mins, let it stand as it is for 5 minutes and open the cooker, add chopped coriander leaves and mix gently.
  23. 12-cook

Notes

    • Soaking rice in warm water helps in rice getting cooked fast and also gives long grains.
    • I used India gate aged rice.
    • Adding ghee, salt and mint leaves immediately after draining the rice adds a lots of flavor. So do not skip it.
    • Do not cook the rice too much time before making the biryani. Make sure to use the rice as soon as it is cooked. If you keep the boiled rice for long time, it will become dry and be like uncooked rice.
    • Do not over mix as it will break the rice grains.
    • Washing and squeezing the cooked soya chunks completely, ensures to get rid of the smell.
    • You can add vegetables along this too.

Serve hot with onion raita the best or even you can add a vegetable kurma as side dish.

Check out the other soya recipes : Soya chunks curry recipe  | Soya kheema toast recipe  | Soya kheema paratha  | Soya bean dry curry

soya-chunks-biryani

Senin, 21 Juli 2014

Baby corn pepper fry recipe (Stir fry)

baby corn-recipes     
I cook baby corn weekly once atleast as it is one of the few vegetable that Aj eats. But Vj used to always complain he gets a different (medicine) smell in baby corns when ever I make something with baby corn. Recently I have started buying Organic vegetables that is available in Fairprice. They have very few choice, so I look for and buy possible vegetables like ladies finger, radish, beans, cabbage, cucumber and this baby corn. Carrots rarely will be good, so pick that too. You would have seen these cute carrots in my carrot orange juice. But now a days, not so good looking carrots is there in the organic section, so I go for the usual Australian carrots.  But Vj always now a days insists to buy these organic baby corns as he finds it perfect. He complains no odd smell in it. Even I realize that. I make baby corn bajji for Aj or this stir fry these days.
baby-corn-pepper-stir-fry

Baby corn pepper fry recipe

Recipe Cuisine: Indian  |  Recipe Category: Breakfast
Prep Time: 10 mins    |  Cook time: 20 mins    Serves: 2

Ingredients

Baby corn  10 
Onion  1 
Garlic  3 flakes 
Red chilli powder or sambar powder (Optional)  3/4 tsp 
Black pepper powder  1 tsp 
Tomato ketchup or sauce  1 tsp 
Salt  As needed 


To temper

Oil 2 tsp
Mustard 3/4 tsp
Jeera 1 tsp
Curry leaves 1 sprig


Method

  1. Clean and cut baby corn into thin rounds. You can cut as long thin strips too, but I always cut into thin circles. Pressure cook it with little water and salt for 2 whistles. In a pan, heat oil and temper with the items given under ‘To temper’ table, followed by crushed garlic (with skin is fine).
  2. 1-cook
  3. Fry onion till transparent. Add cooked baby corn, salt, ketchup, chilli powder, pepper powder.
  4. 2-add
  5. Mix and stir in medium flame for 3 minutes. Drizzle little oil if needed. 
  6. 3-fry

Notes

    • Adding half chilli powder and half pepper powder adds spiciness and flavor to the stir fry. So I recommend using chilli or sambar powder too for best results.

Serve as accompaniment for any rice – We had with Fried rice.

baby corn-pepper-fry-recipe

Sabtu, 19 Juli 2014

Semiya biryani, Thayir semiya, masala vadai - Lunch menu 41

semiya biryani recipe / vermicelli biryani

I am back on track and here I am with my lunch menu 41 for the lunch menu series. This has been in my mind for long time, so made this today. This can be a brunch, lunch or you can make for dinner too. Easy and interesting to make as its different from the regular cooking. I thought of posting atleast some breakfast menus to keep the blog lively when I went to Chennai, but I don’t know if there wasn’t any exiting menu to click or I just was enjoying my break, the one month just flew like a minute. So I could post only 2 posts per week which I kept ready and had to forget my space other days. Last week itself I thought of posting a lunch menu or a breakfast menu as Vj’s friend came over for stay, but just forgot. Today also I cooked, clicked, finished eating and was deep into a movie that I forgot to post. Then Vj had to remind me to post. Out of touch and routine you seeBig Grin. So here is the lunch menu with Semiya biryani (vermicelli biryani) thayir semiya (curd vermicelli) and masala vadai. Scroll down for knowing how I prepared this menu and for the recipe links and other ideas.

Semiya Biryani, curd semiya, masala vadai - Lunch menu 41

Recipe Cuisine: South Indian   |  Recipe Category: Lunch
Prep Time: 3 hrs soaking     |  Cook time: 1 Hr 30 mins |  Serves: 3
  1. On wake up or after your breakfast works are over, soak dal (3 hrs) for masala vadai.
  2. Chop vegetables for biryani, keep aside. Peel garlic, slice 2 onions – one for biryani, one for raita. Chop one onion finely for masala vadai.
  3. Keep other ingredients like green chillies, mint & coriander leaves, (carrot & pomegranate) for thayir semiya, coriander, curry leaves for vadai. Grind for biryani as in the recipe. (I made a no grind version).
  4. First temper for curd semiya. Then prepare biryani. Simmer the biryani and let it get cooked.
  5. Cook semiya for curd semiya and keep aside for cooling.
  6. Grind for masala vadai and mix everything and keep aside.
  7. Biryani would have been done by this time and mix, prepare curd semiya as well.
  8. Prepare raita and lastly fry some vadams and make masala vadais hot.

Enjoy with your family – Semiya biryani, curd semiya, masala vadai, raita, pickle and vadams.

semiya biryani, curd semiya, masala vada

Check out the recipes
  1. Semiya biryani recipe
  2. Curd semiya recipe
  3. Masala vadai recipe
  4. Koozh vadam recipe
  5. Pickle recipes
You can add phulka and a mixed vegetable kurma to this menu to make it more elaborate. You can try semiya payasam or semiya kesari too for dessert.
Have a great weekendHappy


Jumat, 18 Juli 2014

Thinai sweet paniyaram recipe Foxtail millet recipes

foxtail-millet-recipe
Yes, you heard it right! Me too joined the club of sirudhaniyam / millets, after my parents bought me these during my recent India visit. My mom started using siruthaniyangal as she wanted to change her eating habits coz of her health issues. So she asked me too to include these in our cooking and bought me these. My dad packed everything with a piece of handwritten paper with the millets name in each so that it can be easily identified. Sure it is looking very similar to each other. I was very much worried before handling and cooking these millets, but its not complicated at all. Taste also better than the oats Winking. Not comparing them, but just saying. So far I have made only this paniyaram and upma with barnyard millet (kuthiraivali). I loved the upma too, it was just like arisi noi upma. Soon will post the upma, which is easy and basic to cook. Now this flavorful thinai sweet paniyaram.
thinai foxtail millet recipes


Thinai sweet paniyaram (Foxtail millet) recipe

Recipe Cuisine: Indian  |  Recipe Category: Breakfast
Prep Time: 2 hrs soaking + 2 hrs standing     |  Cook time: 15 mins    Makes: 10

Ingredients


Foxtail millet Thinai  1/2 cup 
Rice flour  3 tblsp 
Wheat flour  3 tblsp 
Jaggery  1/4 cup heaped 
Grated coconut  1/4 cup 
Salt  A generous pinch 
Sesame oil and ghee  As needed 
Cardamom  1 
Cooking soda  1 small pinch 

Method

  1. Wash once and soak the millet for 2 hrs. Place it in a blender with very little water, as it gets water after grinding easily if water is more. 1-soak
  2. Grind smoothly and transfer to a container. Add powdered jaggery, rice flour, wheat flour, coconut, salt and powdered cardamom seeds. 2-grind
  3. Mix well and set aside for 2 hrs. After 2 hrs mix well again, add a pinch of cooking soda and heat the paniyaram pan, pour 1/4 tsp oil in each shallow and pour this batter. 3-stand
  4. Cook covered in medium flame for 2 minutes. Flip and add more oil or ghee and cook until it turns golden brown. 4-cook

Notes

    • You can add half a banana too to this batter to make it softer.
    • Make sure the batter is not water or too thick. If watery, you may not be able to take from the paniyaram pan. If too thick, inside will not be cooked. So adjust the consistency.
    • To make the runny batter thick, you can add more wheat flour.
    • Sesame oil and ghee makes it smell awesome, so its recommended.
    • Giving standing time makes the paniyaram softer.

This paniyaram slightly has the thinai’s flavor, which very well goes with jaggery. Enjoy hot!

thinai-sweet-paniyaram

Selasa, 15 Juli 2014

Kashmiri naan recipe | Kids recipes

kashmiri-naan-recipe
I had kashmiri naan only twice before. That too it came along the naan basket and it ended up in my plate once and only the second time, I somewhat felt like having something sweet and had a wish to eat Kashmiri naan. Honestly I have no idea about Kashmiri cuisine, so I don’t even know if this is really a Kashmiri cuisine or the restaurants developed this recipe and named it so since this is sweet. But this sure is a great tasting naan recipe, kids as well as adults will sure love this. I mostly make no yeast naan, but I tried adding yeast in this recipe. I was not very confident if I could bring the same taste and also worried how it will be rolled out without messing it. But trust RaksAngel, this is so easy and rolling part is not at all tricky. Comes out neatHappy. Stays soft, so pack it for your kid. I made it with maida, if you want you can try with atta too. Not sure about the texture, but I guess it would be nice too.
kashmiri-naan-recipe1

Kashmiri naan recipe

Recipe Cuisine: Indian  |  Recipe Category: Lunch/ Dinner
Prep Time: 2 hrs dough resting time    |  Cook time: 30 mins    Makes: 4

Ingredients

For the dough

Maida  1 cup 
Milk  1/4 cup 
Curd/ Plain yogurt  1/4 cup 
Instant yeast  1/2 tsp 
Baking powder  1/4 tsp 
Baking soda  2 pinches 
Sugar  1/2 tsp 
Oil/ melted butter  1 & 1/2 tblsp 
Salt  As needed

For stuffing

Badam 15
Cashew nuts 6
Glazed cherries 10
Sugar 3 tblsp (or as needed)


Method

  1. To make the dough, first place the flour in a mixing bowl. Add yeast, sugar, salt, baking powder, baking soda to it and mix well.Make a dent in the middle. Add curd, milk and oil.
  2. 1-mix
  3. Gather together to make dough and knead well for 5 minutes until smooth. Keep aside for 2 hrs atleast.
  4. 2-knead
  5. Keep covered leaving enough space for the dough to rise and cover the mouth of the bowl with cling wrap or lid. Let it be a warm space. The dough would have risen and doubled in volume.Punch down and knead again to make it smooth.
  6. 3-punch
  7. Soak badam in warm water for an hour and peel off the skin. In a blender, coarsely grind the glazed cherry, sugar, badam and cashews. Set aside in a bowl.
  8. 4-grind
  9. Divide the dough into 4 equal sized balls. In a well dusted counter top, use your hands to spread the dough into a small disk.
  10. 5-flat
  11. Spoon 2 tblsp of the ground sweet mixture. Cover and pinch the ends together as shown in the picture.
  12. 6-stuff
  13. Again dust and roll out into thick, oblong naans. While rolling, if the naan shrinks back, drizzle some oil in the counter top and again roll out.  Flip and roll both sides for even distribution of the mix throughout the dough.
  14. 7-cook
  15. Heat a pan and cook the naan in medium flame. You can cook covered to make it puff up as it makes the naan soft.
  16. 8-cook
  17. Flip and butter if desired and cook until brown spot appears here and there. Cook in low to medium flame for even cooking.
  18. 9-ready

Notes

    • Please adjust the sugar according to suit your taste.
    • Add nuts just as mentioned, too much of badam or cashew will give a raw smell otherwise.
    • You can add red food colour too along with this stuffing to make it more colourful.
    • You can make this without yeast too.
    • Important: I have used Instant yeast here. It is used less in amount than the other yeasts. Also it can be directly added to the flour without dissolving. If using active dry yeast, please dissolve 1 tsp(for this recipe) of the yeast in lukewarm milk along with sugar, wait for 10 minutes to froth and then use this to make dough along with curd and oil, otherwise recipe and everything same. You can ask me if you have doubts regarding yeast.
This naan stays soft even after cooling down. So its perfect for kids lunch box. We eat this as such. I am not sure which side dish will be apt for this.
You may also like : Naan without yeast  |  Nutella chapathi    |    Butter Kulcha

Kashmiri-naan

Minggu, 13 Juli 2014

Pirandai thuvaiyal recipe | Pirandai chutney for rice

pirandai-thogaiyal-recipe
When I went to India this year, after all the travels to temples and relatives house, we decided to go to my mom’s place. By then, coz of all those travels, Vj’s tummy got upset. What ever he eats, he got heart burning. So immediately my mom went to her mini garden and picked some of these pirandai (Cissus quadrangularis ,known as Hadjot in Hindi) and made thogaiyal out of it. Pirandai has various health benefits out of which, it is good for heart burn. My mom gave a lot of pirandai to carry to Chennai and suggested me to plant one or two in the plant pot so that it will be lively and I can carry it to Singapore. I planted it in the pot, but I have not brought it here, coz, I was afraid if we could carry plants through air. Also I forgot, I should agree. So left it there. But I am not sure how it will grow and get utilized. But we made again pirandai thogaiyal at Chennai. So I took the opportunity to click picture for my post. My MIL and mom said we can make adai also out of it. But this time only thogaiyal and wish to try adai next time. And if you know about this plant, please let me know how you call it in your region, in your language – in comments section, thank you.

Pirandai thogaiyal recipe

Recipe Cuisine: Indian  |  Recipe Category: Lunch- side dish
Prep Time: 15 mins    |  Cook time: 15 mins    Makes: 3/4 cup

Ingredients


Pirandai, cleaned & chopped finely 1 cup 
Red chilli, long variety  6 
Urad dal  1/4 cup 
Tamarind  1/2 tsp tightly packed 
Asafoetida  1/4 tsp 
Salt  As needed 
Sesame oil  2 tblsp 


Method

  1. First cut the pirandai at each nodes and using a knife, scrap the sharp thin edges.Careful with this as it could be an itchy process or even sometimes irritates the skin. Then chop it into small pieces.
  2. Heat kadai with little and roast chilli, urad dal and asafoetida until urad dal is golden in colour. In the same kadai, add rest of the oil and sautee the chopped pirandai well in medium flame with constant stirring, until the colour changes pale.
  3. 2-fry
  4. Cool down and first powder chilli, salt, tamarind, asafoetida into a coarse powder. Later add the sauteed pirandai.
  5. 3-roast
  6. Grind coarsely. Add little water and grind again. Now it will be bit smooth to look.
  7. 4-grind
  8. Lastly add urad dal and grind to a coarse thick paste. Check for salt and transfer to the serving bowl.
  9. 5-grind

Notes

    • Make sure to use only the finger tips to avoid itchy and sore fingers.
    • The pirandai should be sauteed well otherwise it will be even itchy in your tongue.
    • Make sure to remove the sharp edges as well. The nodes also should not be included.

Mix with hot rice and ghee or sesame oil generously. It tastes same as thengai thogaiyal, you won’t believe.

pirandai-thogaiyal
 

Blogger news

Blogroll

About